
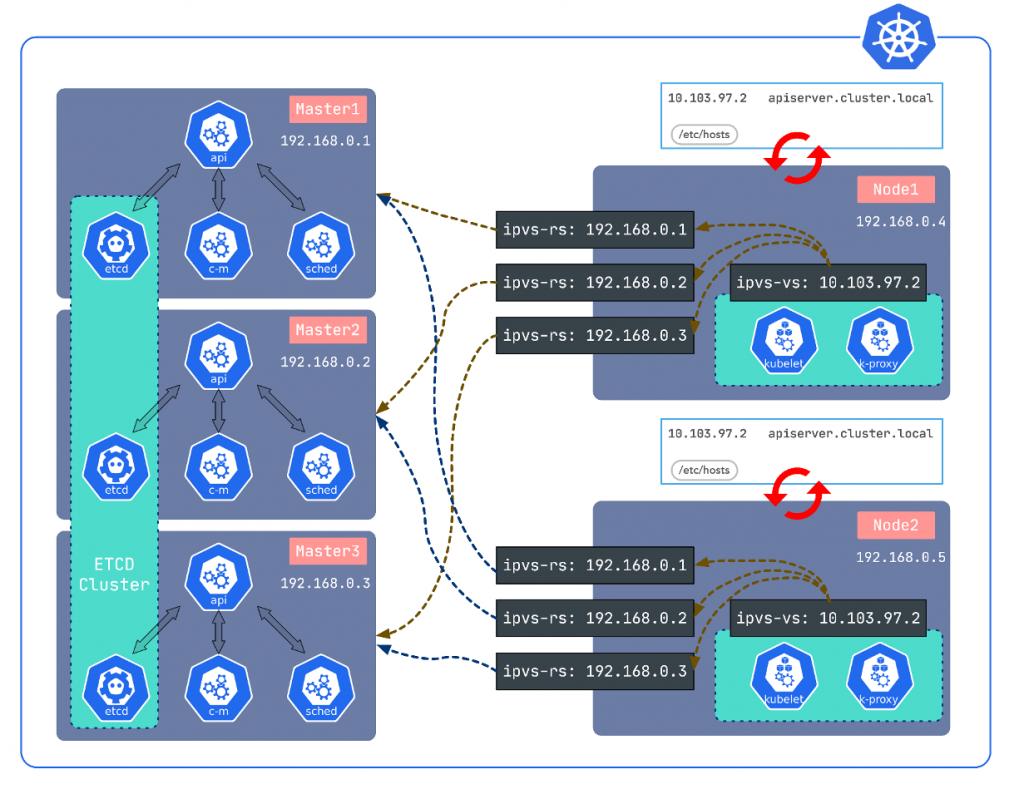
需要考虑高可用的组件:
node不需要考虑高可用
ETCD实现高可用;


raft算法决定:3、5、7…个节点
controller-manager和scheduler
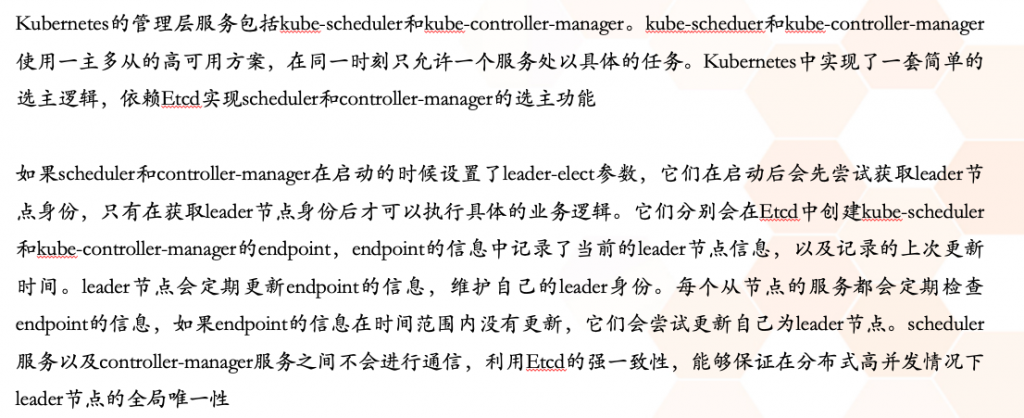
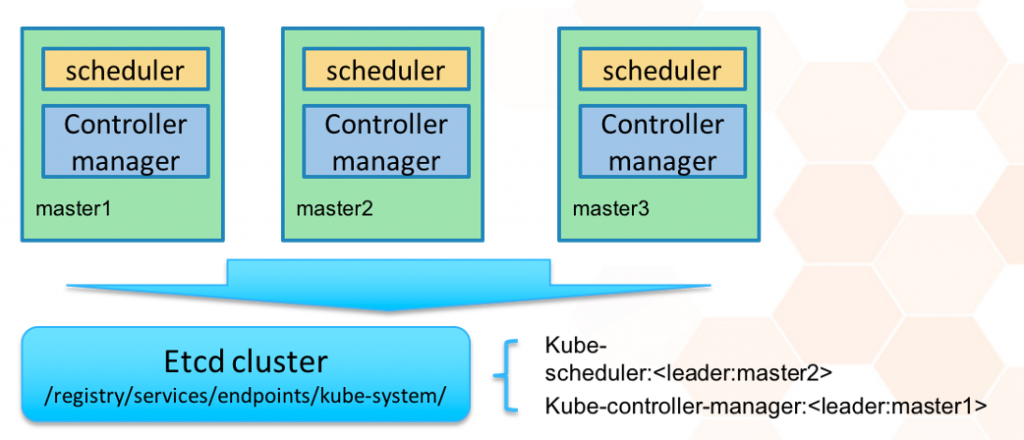
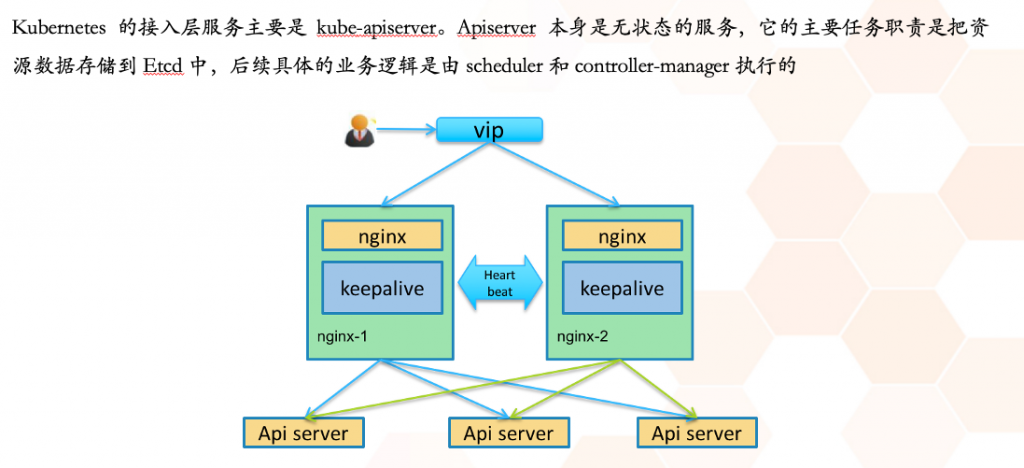
apiserver
最终:部署三组apiserver 、controllser-manager和scheduler、ETCD

高可用厂商:

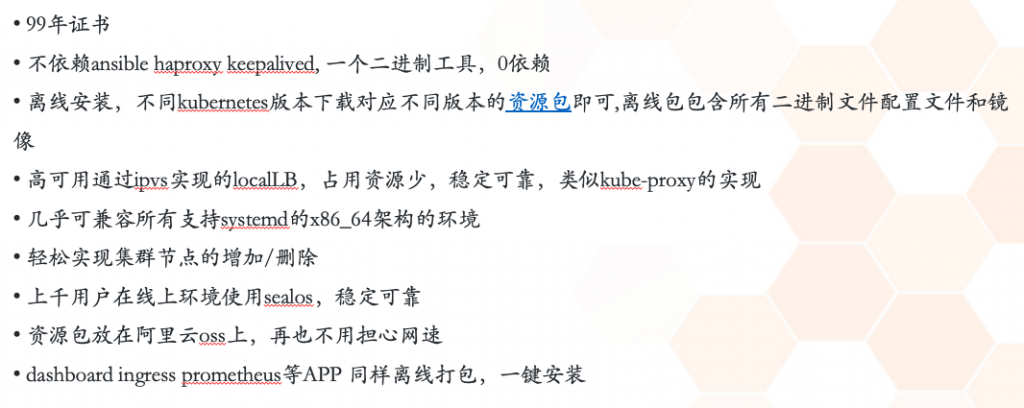
Sealos介绍:
搭建:
官网:https://www.sealyun.com/
实验说明:使用三主一从方式部署(从节点应该为多个)
192.168.1.10 k8s-master01
192.168.1.11 k8s-master02
192.168.1.12 k8s-master03
192.168.1.13 k8s-node01
初始化操作:
安装依赖包
yum install -y conntrack ntpdate ntp ipvsadm ipset iptables curl sysstat libseccomp wget vim net-tools git
设置防火墙为 Iptables 并设置空规则
systemctl stop firewalld && systemctl disable firewalld
yum -y install iptables-services && systemctl start iptables && systemctl enable iptables && iptables -F && service iptables save
关闭selinux
setenforce 0
sed -i 's/enforcing/disabled/' /etc/selinux/config
关闭swap分区
临时关闭
swapoff -a
永久
sed -ri 's/.swap./#&/' /etc/fstab
设置规划主机名
hostnamectl set-hostname k8s-master01;bash
hostnamectl set-hostname k8s-master02;bash
hostnamectl set-hostname k8s-master03;bash
hostnamectl set-hostname k8s-node01;bash
写入配置中
cat << EOF>> /etc/hosts
192.168.1.10 k8s-master01 m1
192.168.1.11 k8s-master02 m2
192.168.1.12 k8s-master03 m3
192.168.1.13 k8s-node1 n1
EOF
将桥接的 IPv4 和IPv6流量传递到 iptables 的链
modprobe br_netfilter
cat << EOF > /etc/sysctl.d/k8s.conf
net.bridge.bridge-nf-call-ip6tables = 1
net.bridge.bridge-nf-call-iptables = 1
EOF
sysctl -p /etc/sysctl.d/k8s.conf
调整内核参数:
cat < /etc/sysctl.d/kubernetes.conf
net.bridge.bridge-nf-call-iptables=1
net.bridge.bridge-nf-call-ip6tables=1
net.ipv4.ip_forward=1
net.ipv4.tcp_tw_recycle=0
vm.swappiness=0 # 禁止使用 swap 空间,只有当系统 OOM 时才允许使用它
vm.overcommit_memory=1 # 不检查物理内存是否够用
vm.panic_on_oom=0 # 开启 OOM
fs.inotify.max_user_instances=8192
fs.inotify.max_user_watches=1048576
fs.file-max=52706963
fs.nr_open=52706963
net.ipv6.conf.all.disable_ipv6=1
net.netfilter.nf_conntrack_max=2310720
EOF
sysctl -p /etc/sysctl.d/kubernetes.conf
sysctl --system
时间同步
yum -y install ntpdate
ntpdate ntp1.aliyun.com
查看是否同步
date +%s
将当前的 UTC 时间写入硬件时钟
timedatectl set-local-rtc 0
重启依赖于系统时间的服务
systemctl restart rsyslog
systemctl restart crond
可选(建议):
关闭系统不需要服务
systemctl stop postfix && systemctl disable postfix
设置 rsyslogd 和 systemd journald
mkdir /var/log/journal # 持久化保存日志的目录
mkdir /etc/systemd/journald.conf.d
cat > /etc/systemd/journald.conf.d/99-prophet.conf <<EOF
[Journal]
# 持久化保存到磁盘
Storage=persistent

# 压缩历史日志
Compress=yes

SyncIntervalSec=5m
RateLimitInterval=30s
RateLimitBurst=1000

# 最大占用空间 10G
SystemMaxUse=10G

# 单日志文件最大 200M
SystemMaxFileSize=200M

# 日志保存时间 2 周
MaxRetentionSec=2week

# 不将日志转发到 syslog
ForwardToSyslog=no
EOF
systemctl restart systemd-journald
kube-proxy开启ipvs的前置条件
modprobe br_netfilter

cat > /etc/sysconfig/modules/ipvs.modules <<EOF
#!/bin/bash
modprobe -- ip_vs
modprobe -- ip_vs_rr
modprobe -- ip_vs_wrr
modprobe -- ip_vs_sh
modprobe -- nf_conntrack_ipv4
EOF

chmod 755 /etc/sysconfig/modules/ipvs.modules && bash /etc/sysconfig/modules/ipvs.modules && lsmod | grep -e ip_vs -e nf_conntrack_ipv4
升级系统内核为最新版本
rpm -Uvh https://www.elrepo.org/elrepo-release-7.el7.elrepo.noarch.rpm
cat /boot/grub2/grub.cfg | grep initrd16

安装最新的内核
yum --enablerepo=elrepo-kernel install -y kernel-lt
查看可用内核版本及启动顺序
awk -F\' '$1=="menuentry " {print i++ " : " $2}' /boot/grub2/grub.cfg

设置内核默认启动顺序
grub2-set-default 0
编辑/etc/default/grub文件
vim /etc/default/grub
设置 GRUB_DEFAULT=0

重新创建内核配置
grub2-mkconfig -o /boot/grub2/grub.cfg
重启系统
shutdown -r now
uname -r
搭建高可用集群(k8s-master01端操作即可):
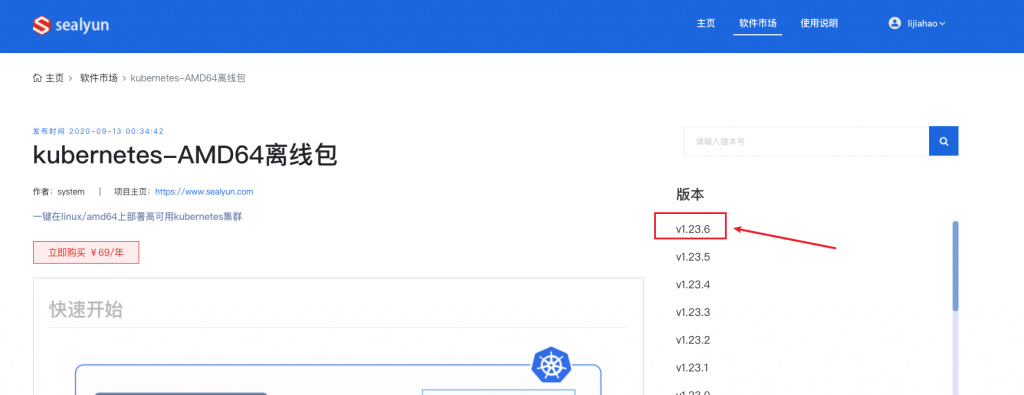
https://www.sealyun.com/goodsDetail?type=cloud_kernel&name=kubernetes
安装包:

下载并安装sealos, sealos是个golang的二进制工具,直接下载拷贝到bin目录即可, release页面也可下载
wget -c https://sealyun-home.oss-cn-beijing.aliyuncs.com/sealos/latest/sealos && chmod +x sealos && mv sealos /usr/bin
下载离线资源包
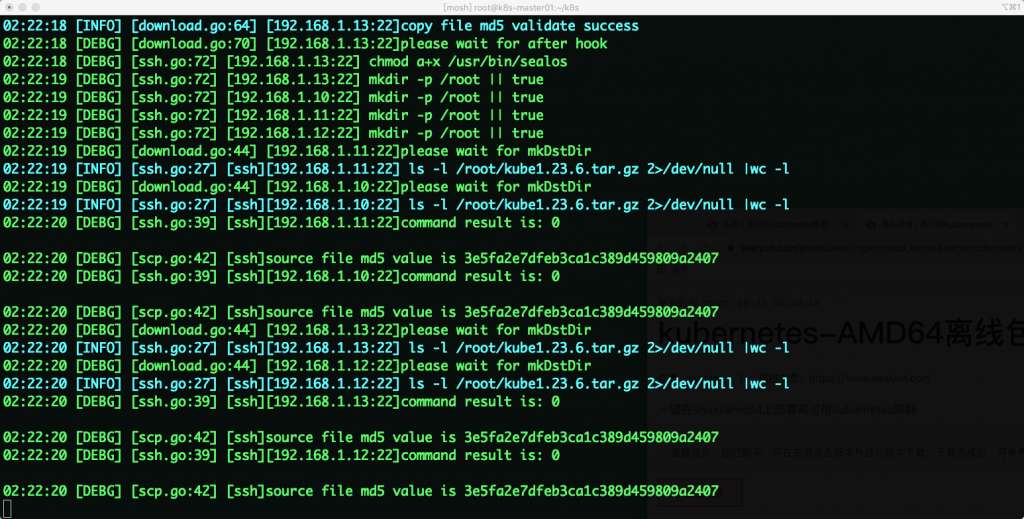
安装一个三master的kubernetes集群
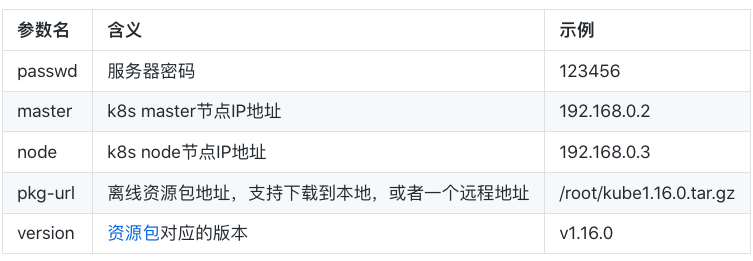
sealos init --passwd '123456' \
--master 192.168.1.10 --master 192.168.1.11 --master 192.168.1.12 \
--node 192.168.1.13 \
--pkg-url /root/k8s/kube1.23.6.tar.gz \
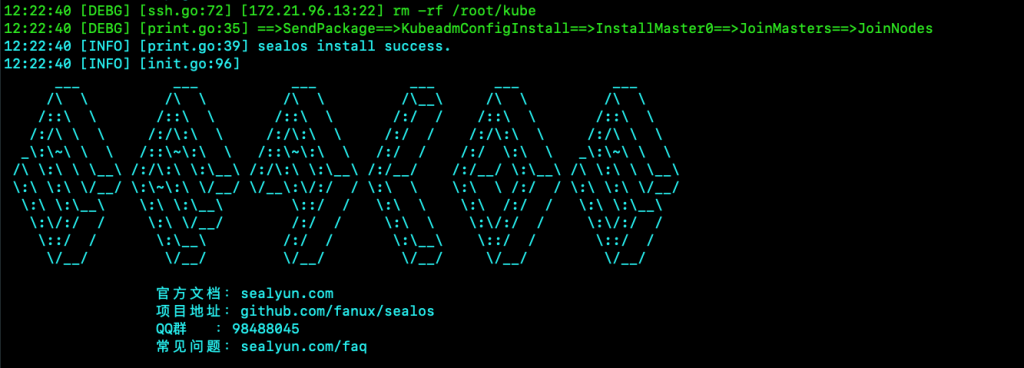
--version v1.23.6sealos init --passwd 123456 --master 192.168.1.10 --master 192.168.1.11 --master 192.168.1.12 --node 192.168.1.13 --pkg-url /root/k8s/kube1.23.6.tar.gz --version v1.23.6等待即可:
安装完成效果图:
参数含义
其他命令:
增加master
sealos join --master 192.168.0.6 --master 192.168.0.7
sealos join --master 192.168.0.6-192.168.0.9 # 或者多个连续IP
增加node
sealos join --node 192.168.0.6 --node 192.168.0.7
sealos join --node 192.168.0.6-192.168.0.9 # 或者多个连续IP
删除指定master节点
sealos clean --master 192.168.0.6 --master 192.168.0.7
sealos clean --master 192.168.0.6-192.168.0.9 # 或者多个连续IP
删除指定node节点
sealos clean --node 192.168.0.6 --node 192.168.0.7
sealos clean --node 192.168.0.6-192.168.0.9 # 或者多个连续IP
清理集群
sealos clean --all
备份集群
sealos etcd save
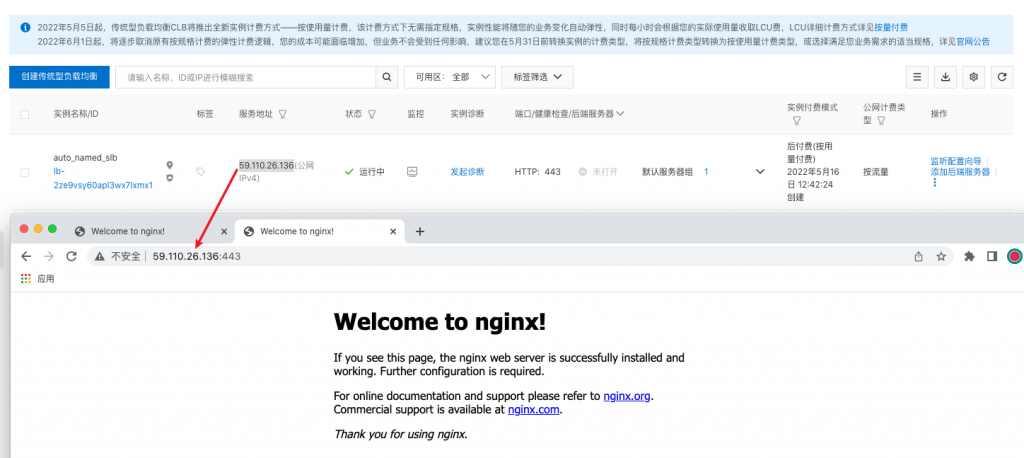
测试(因本地磁盘限制,所以用了阿里云的服务器):

测试创建一个服务并通过公网访问
检查状态
kubectl get node
kubectl get pods --all-namespaces

公网访问(安全组开端口):

还可以添加一个slb进行端口转发,然后通过dns域名解析到服务

还可以配置一下https


可以删除一个master测试高可用,这里不演示了
发布者:LJH,转发请注明出处:https://www.ljh.cool/8404.html
评论列表(1条)
Your blog has helped me through some tough times and I am so grateful for your wise words and positive outlook