
条件判断 when
案例一:根据不同的操作系统,安装不同的软件包
vim tasks.yaml
- hosts: ljh
  tasks:
    - name: yum -y install httpd {{ ansible_distribution }}
      yum: name=httpd state=present
      when: ( ansible_distribution == "CentOS" )

    - name: apt -y install apache2 {{ ansible_distribution }}
      apt: name=apache2 state=present
      when: ( ansible_distribution == "Ubuntu" )
如果是centos系统的装httpd,如果是ubuntu系列的装apache2
结果:
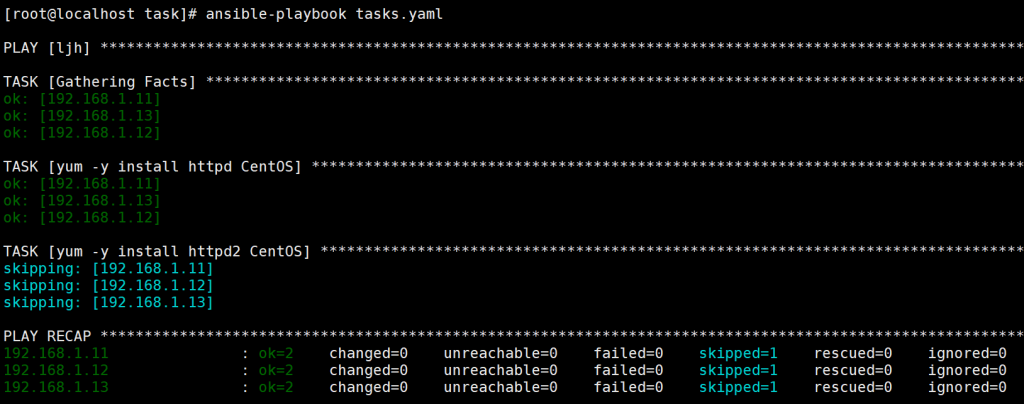

不符合要求的会直接跳过
案例二:为所有web主机添加nginx仓库,其余的都跳过
原理:

- hosts: all
  tasks:
    - name: create yum repo
      yum_repository:
        name: ansible_nginx
        description: ansible_test
        baseurl: https:/mirrors.ljh.com
        gpgcheck: no
        enabled: yes
      when: ( ansible_fqdn is match ("web*") ) # match(“”)模糊匹配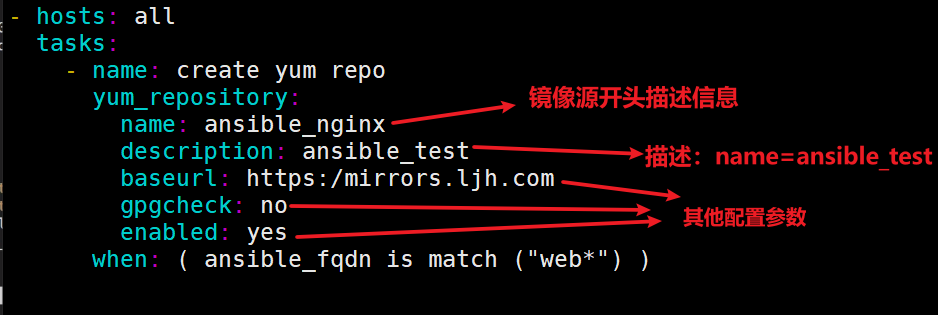
执行:
ansible-playbook tasks.yaml
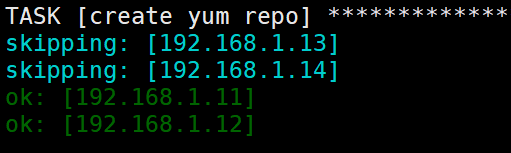
跳过13、14
受控端查看

如果需要多个匹配,使用or继续匹配:(主机名称是web或者db则安装nginx源):
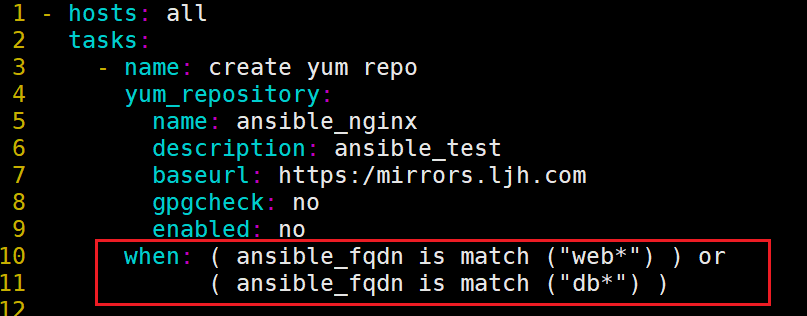
不匹配写法

案例三:测试httpd是否启动,未启动则重启
rc状态码:
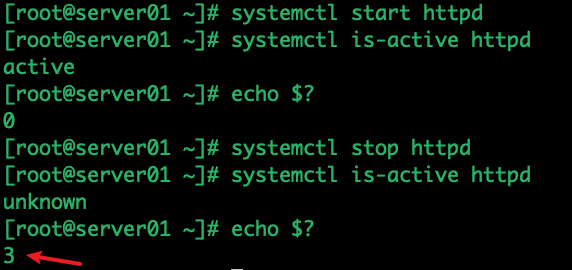
vim tasks.yaml
- hosts: all
  tasks:
    - name: check httpd server
      command: systemctl is-active httpd
      ignore_errors: yes
      register: check_httpd

#通过debug的var输出改变量的所有内容
    - name: debug outprint
      debug: var=check_httpd

    - name: debug
      debug:
        msg: "{{ check_httpd }}"
修改
vim tasks.yaml
- hosts: all
  tasks:
    - name: check httpd server
      command: systemctl is-active httpd
      ignore_errors: yes
      register: check_httpd

#如果check_httpd执行命令状态码结果不等于0,则执行重启httpd,否则跳过
    - name: httpd restart
      service: name=httpd state=restarted
      when: check_httpd.rc != 0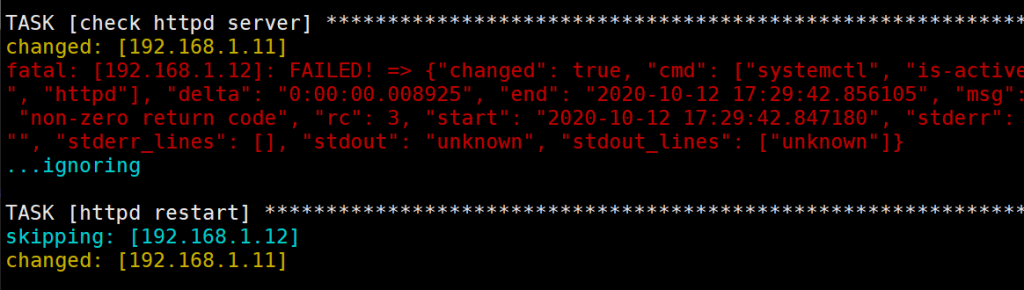
没开启的忽略,开启的重新启动
循环语句
1 循环开启两个服务
vim task.yaml
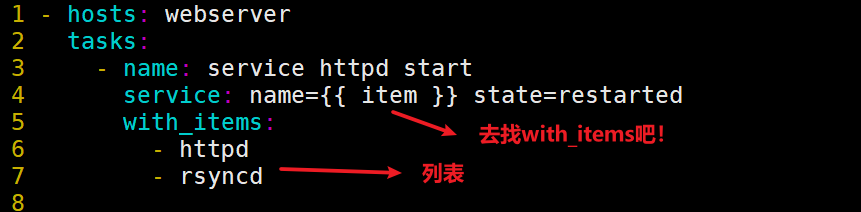
执行结果
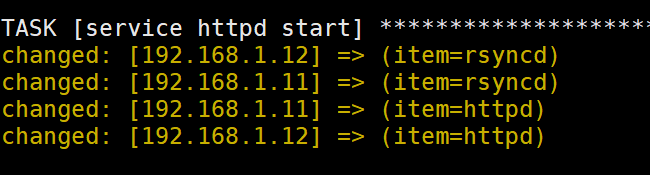
但是,如果修改错11的httpd文件,会照样执行下一个列表的内容
2 循环安装包
vim task.yaml
- hosts: webserver
tasks:
- name: yum -y install mariadb package
yum: name={{ pack }} state=latest
vars:
pack:
- httpd
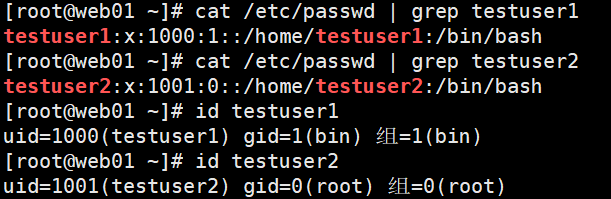
- mariadb-server3:使用字典循环方式批量创建用户
- hosts: webserver
  tasks:
    - name: add users
      user: name={{ item.name }} group={{ item.group }} state=present
      with_items:
        - { name: 'testuser1', group: 'bin' }
        - { name: 'testuser2', group: 'root' }
结果:
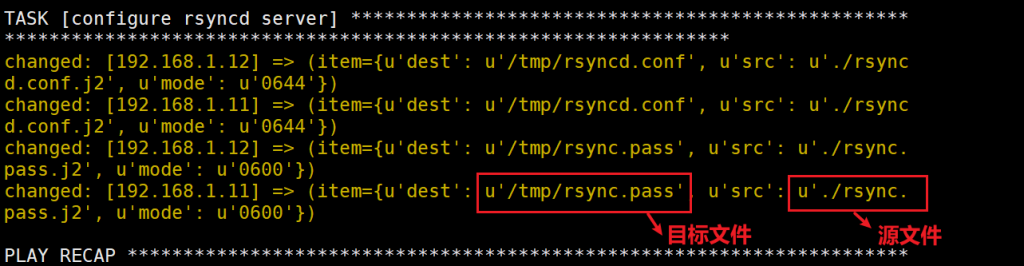
4:使用字典循环方式批量创建文件
- hosts: webserver
  tasks:
#    - name: copy rsyncd.conf
#      copy: src=rsyncd.conf.j2 dest=/tmp/rsyncd.conf mode=0644
#
#    - name: copy rsync.password
#      copy: src=rsync.password.j2 dest=/tmp/rsyncd.conf mode=0600

    - name: configure rsyncd server
      copy: src={{ item.src }} dest={{ item.dest }} mode={{ item.mode }}
      with_items:
        - { src: './rsyncd.conf.j2', dest: '/tmp/rsyncd.conf', mode: '0644' }
        - { src: './rsync.pass.j2', dest: '/tmp/rsync.pass', mode: '0600' }
结果

block 块语句(结构更清晰,建议多使用)
block是ansible在2.0版本引入的一个特性 ##ansible2.0之下的版本无法使用
块功能可以将任务进行逻辑分组,并且可以在块级别上应用任务变量。
同时也可以使用类似于其他编程语言处理异常那样的方法,来处理块内部的任务异常。
原理:block中的组任务,都会继承block的属相(支持when,不支持with_items)
部署时会分别执行组中的任务,并且都会继承block的属相(在任务后添加block的when条件)
块错误处理
rescue 当block中出现错误时,执行相应任务模块。
always 无论block中是否出现错误,最终都执行相应任务模块。
例子:
1、使用块任务分组
---
- hosts: localhost
  tasks:
    - block:
        - yum: name={{ item }} state=installed
          with_items:
             - httpd
             - memcached
        - template: src=templates/src.j2 dest=/etc/foo.conf
        - name: start service
          service: name=bar state=started enabled=True
      when: ansible_distribution == 'CentOS'
      become: true
      become_user: root
2、组装成块异常处理
tasks:
  - block:
      - debug: msg='i execute normally'
      - command: /bin/false
      - debug: msg='i never execute, cause ERROR!'
    rescue:
      - debug: msg='I caught an error'
      - command: /bin/false
      - debug: msg='I also never execute :-('
    always:
      - debug: msg="this always executes"
生产案例:
1、例子一:
首先备份配置文件,执行一次对nginx.conf文件的修改,修改完配置文件会执行nginx -t。如果验证配置文件有问题,则将目前有问题的配置文件打上-failed标签,且回滚之前备份的配置文件。
无论block和rescue中是否发生错误,通过always,都会记录操作日志。
---
- name: test nginx config
hosts: nginx_module
gather_facts: False
tasks:
- name: modify config and test
block:
- name: backup config file
command: cp /etc/nginx/nginx.conf /etc/nginx/conf-backup/nginx.conf
- name: nginx config file add "include"
lineinfile:
path: /etc/nginx/nginx.conf
insertafter: 'include /etc/nginx/conf.d/'
line: 'include /etc/nginx/site-enabled/*.conf;'
- name: nginx config test
command: nginx -t
rescue:
- name: move failed config file
command: mv /etc/nginx/nginx.conf /etc/nginx/nginx.conf-failed
- name: copy backup file
command: mv /etc/nginx/conf-backup/nginx.conf /etc/nginx/
always:
- name: add operation recode
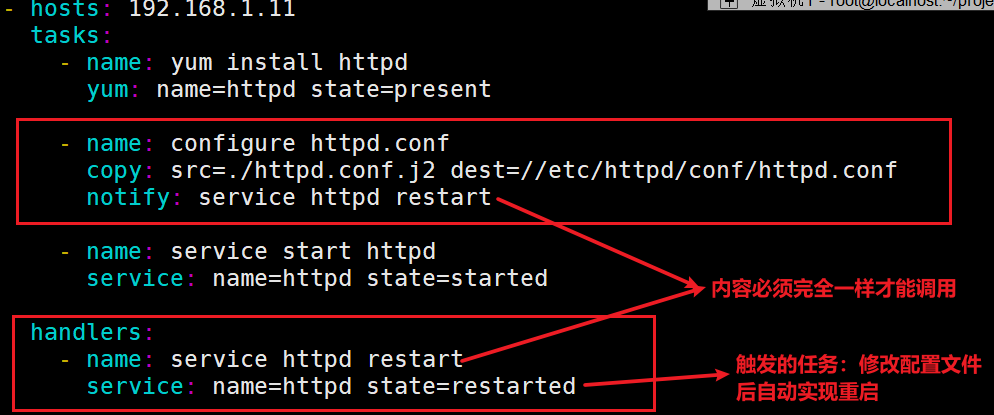
shell: echo `date` modify config >> /etc/nginx/conf-backup/modify-config.log触发器 handlers
生产环境需要修改配置文件,但是已经启动的服务默认不会重启,配置文件不会立即生效,使用handlers可以实现如果检测到已经启动,会自动触发重启机制
这里配置一个httpd服务
实现配置httpd配置并重启生效
修改httpd.conf.j2可以直接实现重启配置文件生效
vim httpd.yaml
- hosts: 192.168.1.11
  tasks:
    - name: yum install httpd
      yum: name=httpd state=present

    - name: configure httpd.conf
      copy: src=./httpd.conf.j2 dest=/etc/httpd/conf/httpd.conf
      notify: service httpd restart # 插个眼,再执行时会注意内容是否有变化

    - name: service start httpd
      service: name=httpd state=started

  handlers:
    - name: service httpd restart # 名字对应
      service: name=httpd state=restarted # 如果有变化,重启服务
vim httpd.yaml
一旦配置文件发生变化,通知某个接口
修改:
vim httpd.conf.j2

结果

产生的新问题:万一配置修改错误怎么办?详见错误处理
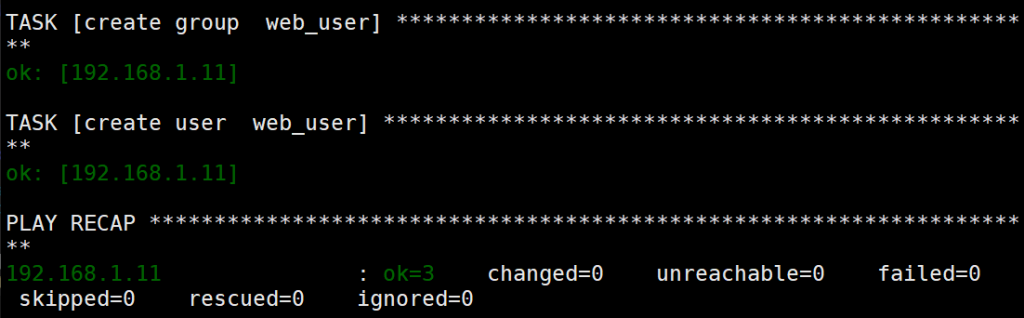
tag标签,根据指定的标签执行,调试
多个tasks任务指定一个tags标签
vim user.yaml
指定标签执行
---
- hosts: 192.168.1.11
tasks:
- name: create group web_user
group: name=web_user gid=666 state=present
tags: test_user
- name: create user web_user
user: name=web_user uid=666 group=666 shell=/sbin/nologin state=present
tags: test_user
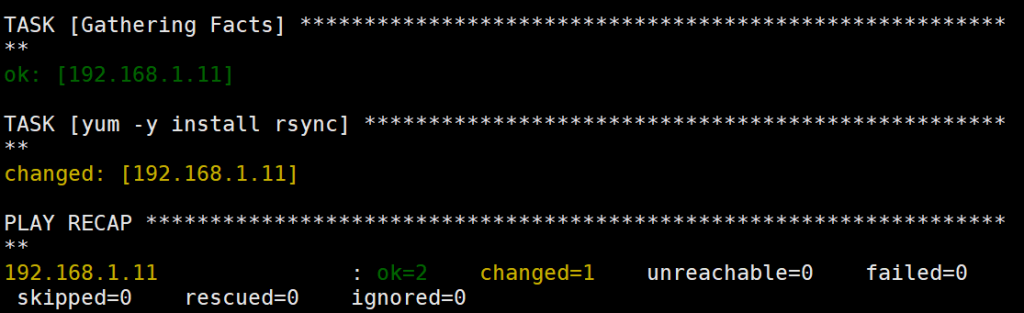
- name: yum -y install rsync
yum: name=rsync state=present
仅执行标签动作
ansible-playbook user.yaml -t "test_user"
跳过指定标签执行
ansible-playbook user.yaml --skip-tags "test_user"
include包含
实例include_tasks:
可以导入部分内容
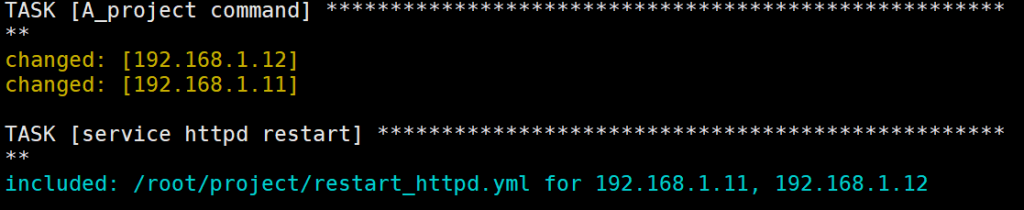
A项目需要重启httpd,B项目也重启httpd,可以在 playbook 中引入相同的动作的文件
vim restart_httpd.yml
- name: service httpd restart
  service: name=httpd state=restarted
vim /etc/ansible/hosts
[ljh]
192.168.1.11
192.168.1.12
vim a_project.yml
- hosts: ljh
tasks:
- name: A_project command
command: echo "A"
- name: service httpd restart
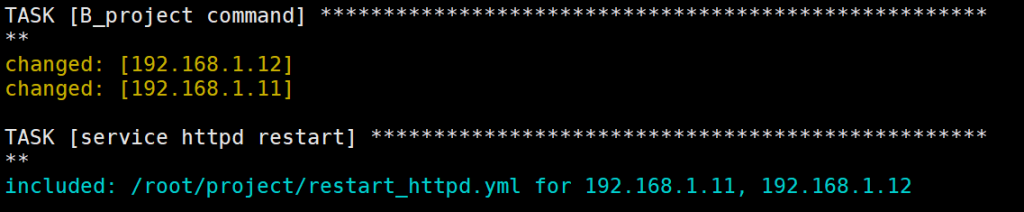
include_tasks: restart_httpd.ymlvim b_project.yml
- hosts: ljh
  tasks:
  - name: B_project command
    command: echo "B"

  - name: service httpd restart
    include_tasks: restart_httpd.yml
ansible-playbook a_project.yml
ansible-playbook b_project.yml
import_playbook合并playbook,必须是导入完整的playbook
vim total.yaml
- import_playbook: b_project.yml
- import_playbook: a_project.yml
错误忽略ignore_errors
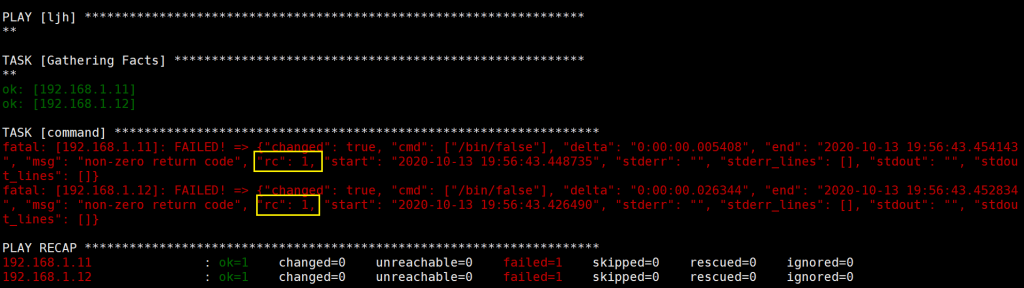
案例一
一般情况下,ansible执行如果遇到错误则会停止继续执行
使用到的测试方式

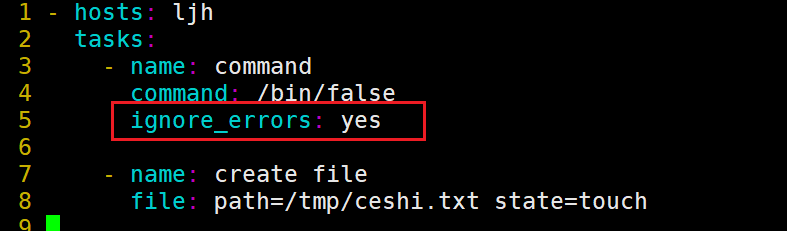
vim ignore_errors.yaml
执行一条错误命令测试
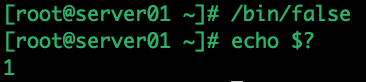
- hosts: ljh
  tasks:
    - name: command
      command: /bin/false
    - name: create file
      file: path=/tmp/ceshi.txt state=touch
报错不继续执行
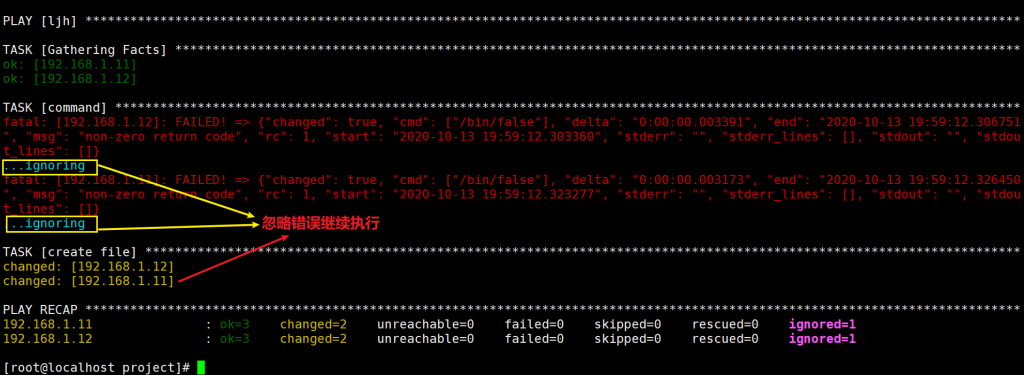
加入ignore_errors
执行结果
案例二
vim is-achive.yaml
- hosts: all
  tasks:

    - name: check http server
      command: systemctl is-active httpd
      ignore_errors: yes
      register: check_httpd

    - name: check httpd server
      debug:
        msg: "{{ check_httpd }}"

    - name: httpd restart
      service: name=httpd state=restarted
      when: check_httpd.rc != 0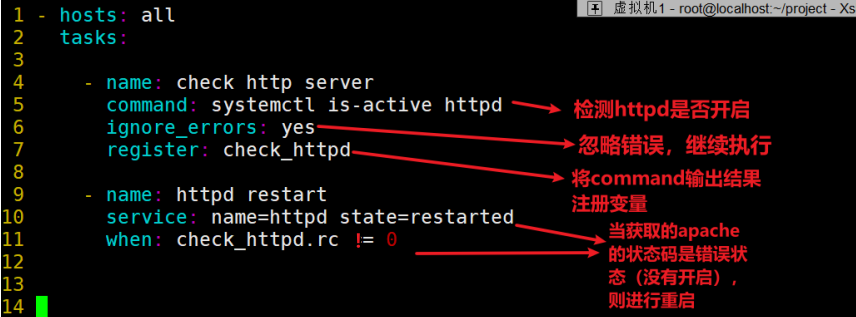
执行结果

错误处理
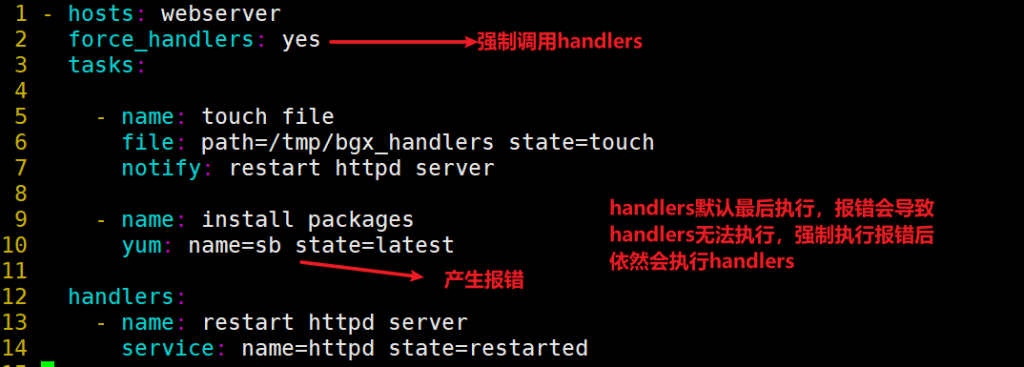
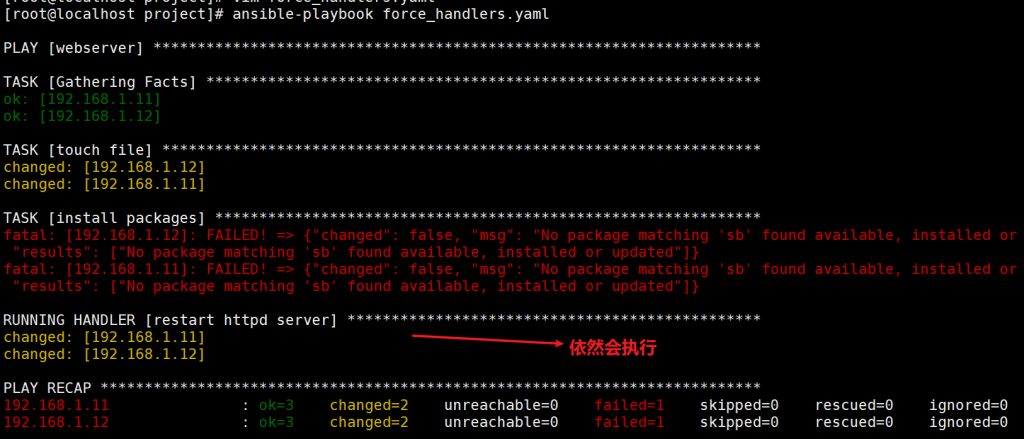
1:强制调用handlers
vim force_handlers.yaml
ansible-playbook force_handlers.yaml
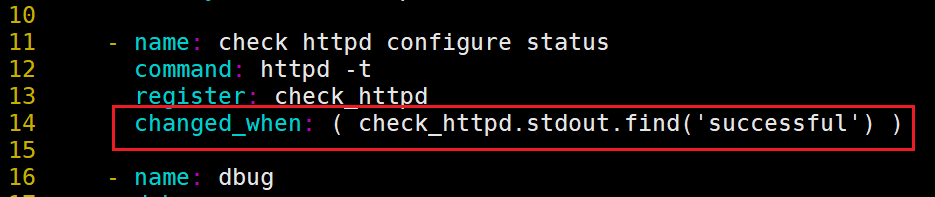
2:使用changed_when检查tasks任务返回结果
涉及需求:需要满足:1、httpd 服务配置文件修改后,检测文件的变化情况(notify)并检测配置文件是否正确(register),如果正确,服务自动重启,否则直接中断 (changed_when)
vim task.yaml
- hosts: webserver
  tasks:

    - name: install httpd server
      yum: name=httpd state=present

    - name: configure httpd server
      copy: src=httpd.conf.j2 dest=/etc/httpd/conf/httpd.conf
      notify: restart httpd server

    - name: check httpd configure status
      command: httpd -t
      register: check_httpd

    - name: dbug
      debug:
        msg: "{{ check_httpd }}"

    - name: service httpd start
      service: name=httpd state=started

  handlers:
    - name: restart httpd server
      service: name=httpd state=restarted
抓取httpd.conf文件
vim httpd.conf.j2
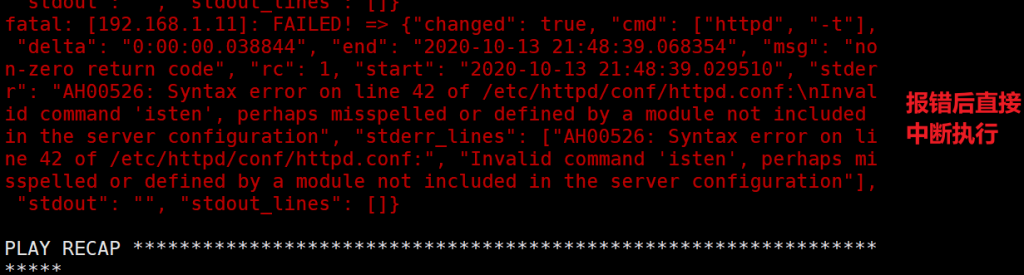
改错文件
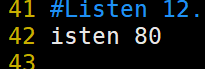
肯定输出错误,但是会继续执行之后的步骤
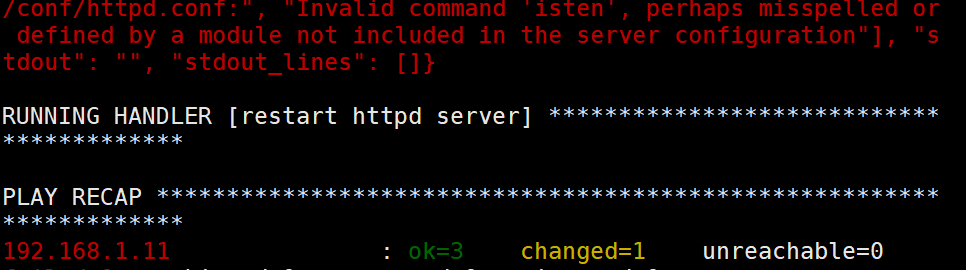
在发送配置文件之后加入判断方式如果不成功,直接中断执行
继续优化,将输出结果关闭
每次修改这里执行命令command都会变黄


执行成功则关掉change显示

如果再次修改配置文件,则网页访问不会受到影响,因为自动检测到报错,则不会重启apache,这种情况重新修改本地配置文件,并再次执行即可
jinjia2
例子:
蒹葭模板既可以提取fact变量(直接引用),也可以手动定义变量
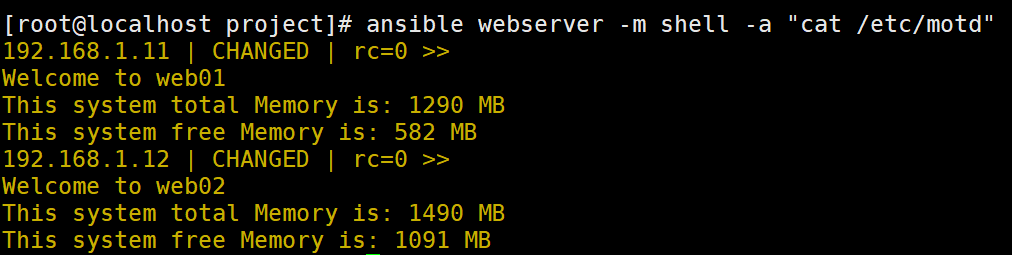
练习1:写一个欢迎界面
vim jianjia.yaml
- hosts: webserver
  tasks:
    - name: copy file /etc/motd
      template: src=./motd.j2 dest=/etc/motd
vim motd.j2
显示主机名,总内存和可用内存
Welcome to {{ansible_hostname }}
This system total Memory is: {{ ansible_memtotal_mb }} MB
This system free Memory is: {{ ansible_memfree_mb }} MB
变量查看
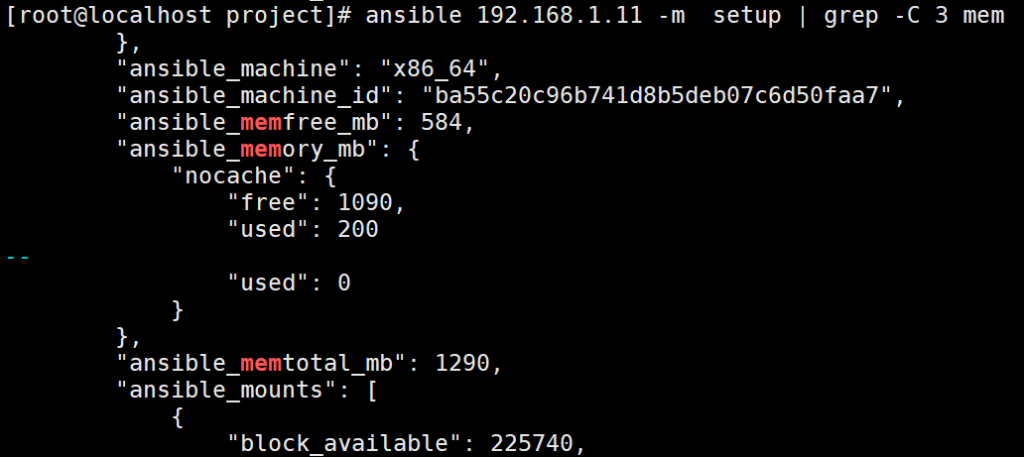
ansible 192.168.1.11 -m setup -a "filter=ansible_hostname"
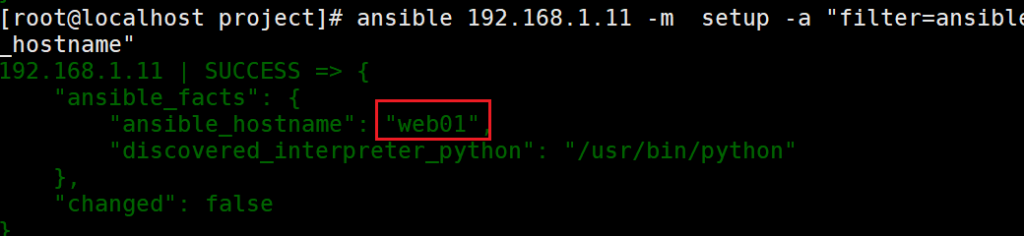
ansible 192.168.1.11 -m setup -a "filter=ansible_memtotal_mb"
ansible 192.168.1.11 -m setup -a "filter=ansible_memfree_mb"
或者是
检测
断开重连

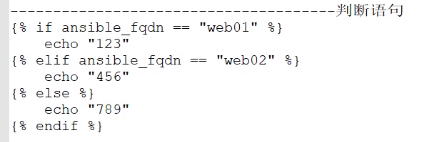
练习2:jinjia2判断
判断不同服务器主机名进行不同操作
格式:

判断语句
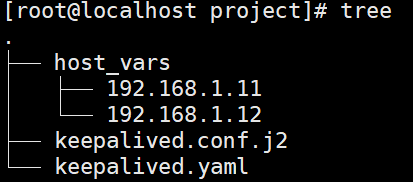
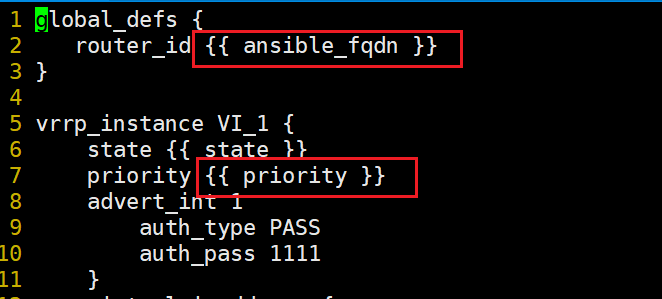
练习jianjia2管理keepalived
要求:使用jinjia2的if判断表达式渲染出keepalived的master和slave的配置文件,并推送至b组
传统实现方式:
inventory中的host_vars根据不同主机设定不同变量
文件结构
vim ./host_vars/192.168.1.11
vim ./host_vars/192.168.1.12
vim keepalived.conf.j2
vim keepalived.yaml
- hosts: webserver
  tasks:

    - name: copy keepalived
      template: src=./keepalived.conf.j2 dest=/tmp/keepalived.conf
在playbook中是when判断主机名称,然后分发不同的配置文件
实现核心配置
- hosts: webserver
tasks:
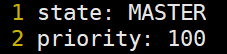
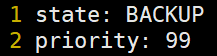
- name: copy keepalived master
copy: src=./slave.conf.j2 dest=/tmp/keepalived.conf
when: ( ansible_fqdn == "web01" )
- name: copy keepalived slave
copy: src=./master.conf.j2 dest=/tmp/keepalived.conf
when: ( ansible_fqdn == "web02" )使用when,增加一个配置文件分别分发
使用jinjia2方式可以更便捷地渲染出不同配置文件
vim keepalived.conf.j2
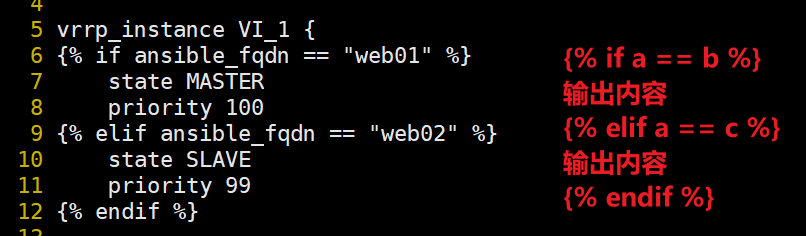
vim keepalived.yaml

- hosts: webserver
  tasks:
    - name: copy keepalived master
      template: src=./keepalived.conf.j2 dest=/tmp/keepalived.conf
练习3:jinjia循环
格式:

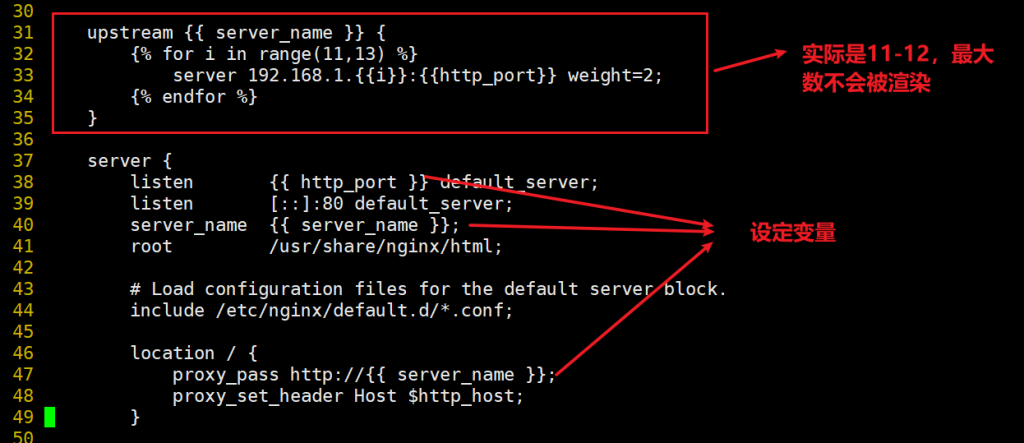
渲染一个负载均衡的配置文件,使用13渲染11和12
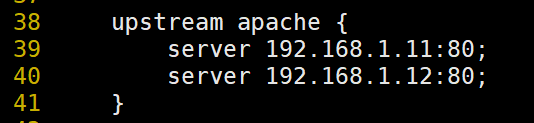
理论上配置文件是这样的
前提:11、12安装了httpd而且开启
vim for.yaml
- hosts: 192.168.1.13
  vars:
    - http_port: 80
    - server_name: www.ljh.com
  tasks:
    - name: copy aliyun mirrors
      copy: src={{ item.src }} dest={{ item.dest }} mode={{ item.mode }}
      with_items:
        - { src: '/etc/yum.repos.d/CentOS-Base.repo', dest: '/etc/yum.repos.d/CentOS-Base.repo', mode: '0644'}
        - { src: '/etc/yum.repos.d/epel.repo', dest: '/etc/yum.repos.d/epel.repo', mode: '0644' }

    - name: yum install nginx
      yum: name=nginx state=present

    - name: installed nginx server
      yum: name=nginx state=present

    - name: configure nginx
      template: src=./nginx.conf.j2 dest=/etc/nginx/nginx.conf
      notify: restart nginx server

    - name: service start nginx
      service: name=nginx state=started enabled=yes

  handlers:
    - name: restart nginx server
      service: name=nginx state=restarted
修改渲染配置文件
vim nginx.conf.j2
user nginx;
worker_processes auto;
error_log /var/log/nginx/error.log;
pid /run/nginx.pid;
# Load dynamic modules. See /usr/share/doc/nginx/README.dynamic.
include /usr/share/nginx/modules/*.conf;
events {
worker_connections 1024;
}
http {
log_format main '$remote_addr - $remote_user [$time_local] "$request" '
'$status $body_bytes_sent "$http_referer" '
'"$http_user_agent" "$http_x_forwarded_for"';
access_log /var/log/nginx/access.log main;
sendfile on;
tcp_nopush on;
tcp_nodelay on;
keepalive_timeout 65;
types_hash_max_size 2048;
include /etc/nginx/mime.types;
default_type application/octet-stream;
include /etc/nginx/conf.d/*.conf;
upstream {{ server_name }} {
{% for i in range(11,13) %}
server 192.168.1.{{i}}:{{http_port}} weight=2;
{% endfor %}
}
server {
listen {{ http_port }} default_server;
listen [::]:80 default_server;
server_name {{ server_name }};
root /usr/share/nginx/html;
# Load configuration files for the default server block.
include /etc/nginx/default.d/*.conf;
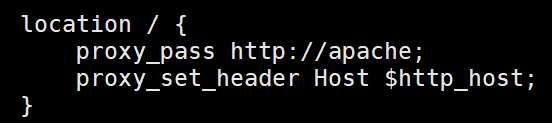
location / {
proxy_pass http://{{ server_name }};
proxy_set_header Host $http_host;
}
error_page 404 /404.html;
location = /404.html {
}
error_page 500 502 503 504 /50x.html;
location = /50x.html {
}
}
}
深入理解 jianjia2(补充部分:可以不看)
jianjia2 语法基础:
注意:Jinja2模版语言,是不区分缩进的,和纯python不同。实际上所有模版语言都不区分缩紧。
常用标记:
注释:`{# 这是注释 #}`
变量:`{{ post.title }}`,或字典元素`{{your_dict['key']}}`,或列表`{{your_list[0]}}`
多行代码块:`{% 开始 %} HTML标签 {% 结束 %}`
示例:
{% if user %}
    {{ user }}
{% else %}
    hello!
    {% for index in indexs %}
        {{ index }}
{% endfor %}
Delimiters(分隔符)
{% … %} 语句([Statements](http://jinja.pocoo.org/docs/dev/templates/#list-of-control-structures))
{{ … }} 打印模板输出的表达式([Expressions](http://jinja.pocoo.org/docs/dev/templates/#expressions))
{# … #} 注释
# … ## 行语句([Line Statements](http://jinja.pocoo.org/docs/dev/templates/#line-statements))
Variables(变量)
除了普通的字符串变量,Jinja2还支持列表、字典和对象,你可以这样获取变量值:
{{ mydict['key'] }}
{{ mylist[3] }}
{{ mylist[myintvar] }}
{{ myobj.somemethod() }}
获取一个变量的属性有两种方式(这两种方法基本相同(深层次的区别可以暂不考虑)):
{{ foo.bar }}
{{ foo['bar'] }}
Filter 过滤器()
一个filter过滤器的本质就是一个function函数。使用格式为:变量名 | 函数。
它做到的就是,把变量传给函数,然后再把函数返回值作为这个代码块的值。
如:
<!-- 带参数的 -->
{{变量 | 函数名(*args)}}

<!-- 不带参数可以省略括号 -->
{{变量 | 函数名}}
链式调用(管道式):
和命令行的pipline管道一样,可以一次调用多个函数(过滤器),如
{{ "hello world" | reverse | upper }}文本块调用(将中间的所有文字都作为变量内容传入到过滤器中):
{% filter upper %}
    一大堆文字
{% endfilter %}
字符串操作:
safe:禁用转义
<p>{{ '<em>hello</em>' | safe }}</p>

capitalize:把变量值的首字母转成大写,其余字母转小写
<p>{{ 'hello' | capitalize }}</p>

lower:把值转成小写
<p>{{ 'HELLO' | lower }}</p>

upper:把值转成大写
<p>{{ 'hello' | upper }}</p>

title:把值中的每个单词的首字母都转成大写
<p>{{ 'hello' | title }}</p>

reverse:字符串反转
<p>{{ 'olleh' | reverse }}</p>

format:格式化输出
<p>{{ '%s is %d' | format('name',17) }}</p>

striptags:渲染之前把值中所有的HTML标签都删掉
<p>{{ '<em>hello</em>' | striptags }}</p>

truncate: 字符串截断
<p>{{ 'hello every one' | truncate(9)}}</p>
列表操作:
first:取第一个元素
<p>{{ [1,2,3,4,5,6] | first }}</p>

last:取最后一个元素
<p>{{ [1,2,3,4,5,6] | last }}</p>

length:获取列表长度
<p>{{ [1,2,3,4,5,6] | length }}</p>

sum:列表求和
<p>{{ [1,2,3,4,5,6] | sum }}</p>

sort:列表排序
<p>{{ [6,2,3,1,5,4] | sort }}</p>
Tests(测试,判断)
Jinja2提供的tests可以用来在语句里对变量或表达式进行测试,如果要测试一个变量,可以在变量后加上“is”和test名,比如:
{% if user.age is equalto 42 %} {# 这里也可以写成... is equalto(42) #}
Ha, you are 42!
{% endif %}
如果要传入参数,可以在test后增加括号,也可以直接写在后面。
常用的test(未说明的均返回True或False):
- boolean
- defined
- equalto
- escaped
- none
- sequence
- string
- number
- reverse
- replace
For/If (列表控制结构)
控制结构是指所有控制程序流的东西-条件(即if/elif/else),前循环,以及宏和块等。 使用默认语法,控件结构会出现在块内。
For:
依次循环每个项目。 例如,要显示一个名为users的变量中提供的用户列表:
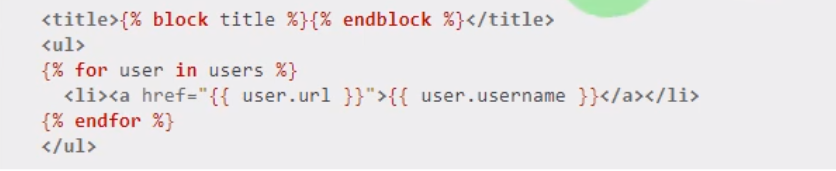
<h1>Members</h1>
<ul>
{% for user in users %}
  <li>{{ user.username|e }}</li>
{% endfor %}
</ul>
由于模板中的变量保留了其对象属性,因此可以像dict这样的容器:
<dl>
{% for key, value in my_dict.items() %}
    <dt>{{ key|e }}</dt>
    <dd>{{ value|e }}</dd>
{% endfor %}
</dl>
循环索引
- loop.index: 循环当前迭代(从1开始)。
- loop.index0: 循环当前迭代(从0开始)。
- loop.revindex: 循环迭代的数量(从1开始)。
- loop.revindex0: 循环迭代的数量(从0开始)。
- loop.first: 是否为迭代的第一步。
- loop.last: 是否为迭代的最后一步。
- loop.length: 序列中元素的数量。
If
Jinja 中的 if 语句与 Python if 语句相当。在最简单的形式中,您可以使用它来测试变量是否已定义,不为空且不为 false:
{% if users %}
<ul>
{% for user in users %}
    <li>{{ user.username|e }}</li>
{% endfor %}
</ul>
{% endif %}
对于多个分支,可以像在 Python 中一样使用 elif 和 else。您也可以在那里使用更复杂的表达式:
{% if kenny.sick %}
    Kenny is sick.
{% elif kenny.dead %}
    You killed Kenny!  You bastard!!!
{% else %}
    Kenny looks okay --- so far
{% endif %}
Ansible Jinja2 模版使用
variables: 可以输出数据,Jinja2支持使用带过滤器的Unix型管道操作符。有很多的内置过滤器可供使用。
{{ my_variable }}
{{ some_dudes_name | capitalize }}
statements: 可以用来创建条件和循环等等
{% if my_conditional %}
    xxx
{% endif %}

{% for item in all_items %}
    {{ item }}
{% endfor %}发布者:LJH,转发请注明出处:https://www.ljh.cool/7135.html