
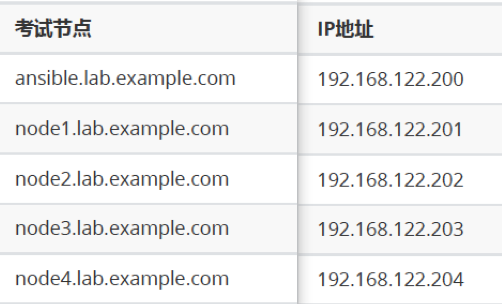
红帽镜像:
链接: https://pan.baidu.com/s/10qL_VyCCChkRQjGgIgv7rQ 提取码: 6lnl
前言:

Ansible控制节点上的所有playbook都以student 用户身份执行。Playbook均放在/home/greg/ansible 目录中。

在ansible上准备
useradd greg && echo "flectrag" > greg
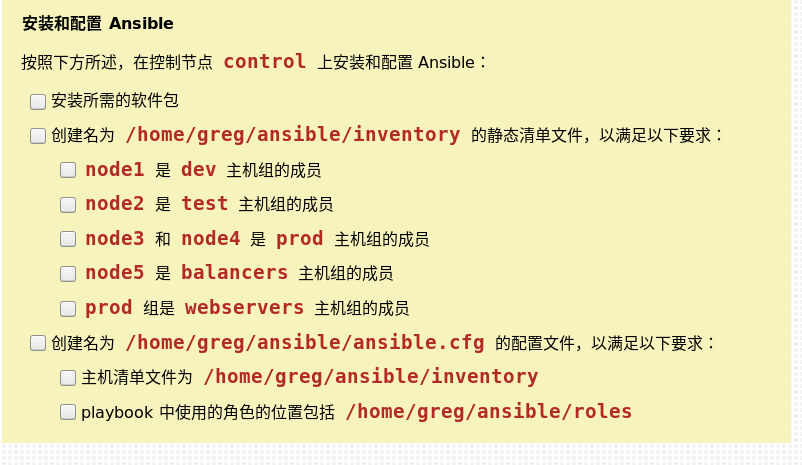
1、安装及配置 ansible
登录:
ssh greg@ansible #使用终端登录账号
创建目录和清单
sudo yum -y install ansible #安装ansible
mkdir -p /home/greg/ansible/roles #创建ansible目录
配置ansible需要管理的主机
vim /home/greg/ansible/inventory
[dev]
node1

[test]
node2

[prod]
node3
node4

[balancers]
node5

[webservers:children]
prod
配置文件
cd /home/greg/ansible/
cp /etc/ansible/ansible.cfg .
vim ansible.cfg
inventory=/home/greg/ansible/inventory
roles_path = /home/greg/ansible/roles
host_key_checking = False    #取消ssh验证,也就是第一次ssh机器时不需要按yes更新密钥,取消注释
[privilege_escalation]
become=True
become_method=sudo
become_user=root
become_ask_pass=False
测试:
ansible all --list-hosts
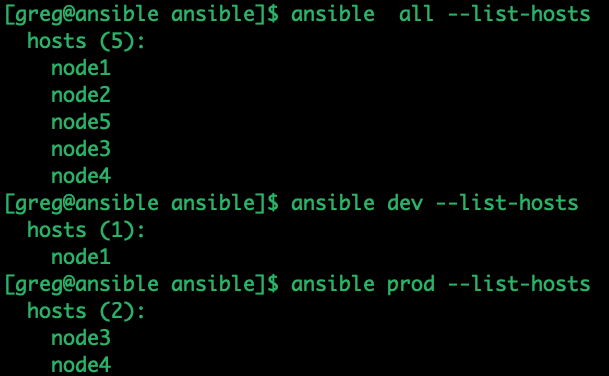
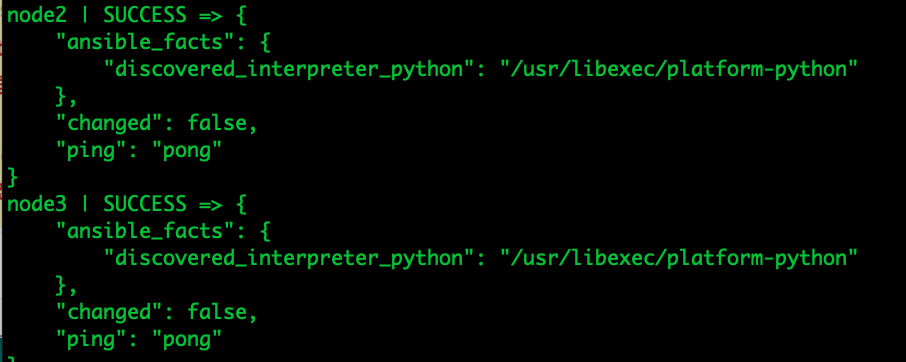
ansible all -m ping
2、创建和运行 Ansible 临时命令
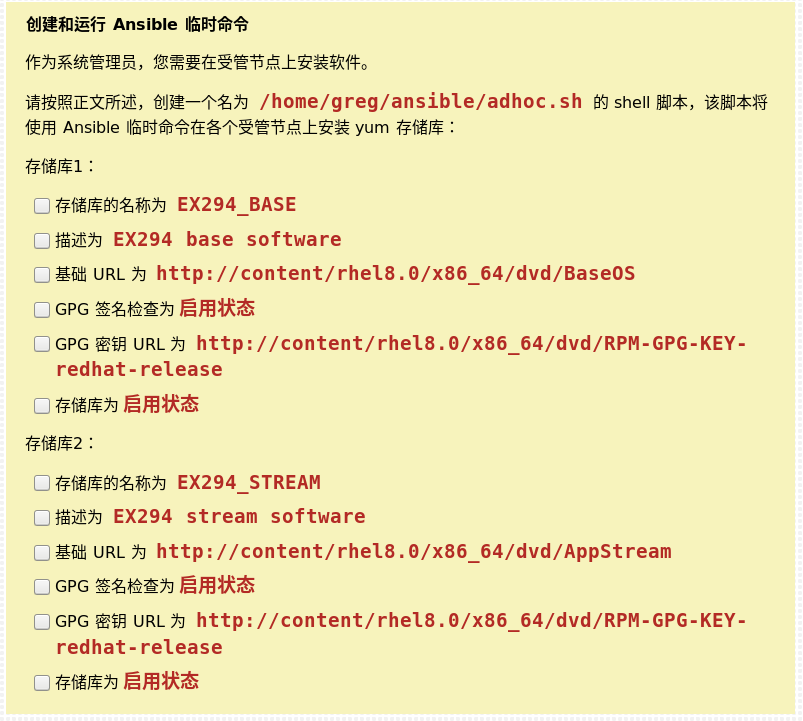
自己练习使用阿里云的存储库:
存储库1:
这里base URL使用:http://mirrors.aliyun.com/centos-vault/8.5.2111/BaseOS/$basearch/os/
GPG key URL使用:http://mirrors.aliyun.com/centos/RPM-GPG-KEY-CentOS-Official
存储库2:
这里base URL使用:http://mirrors.aliyun.com/centos-vault/8.5.2111/AppStream/$basearch/os/
GPG key URL使用:http://mirrors.aliyun.com/centos/RPM-GPG-KEY-CentOS-Official
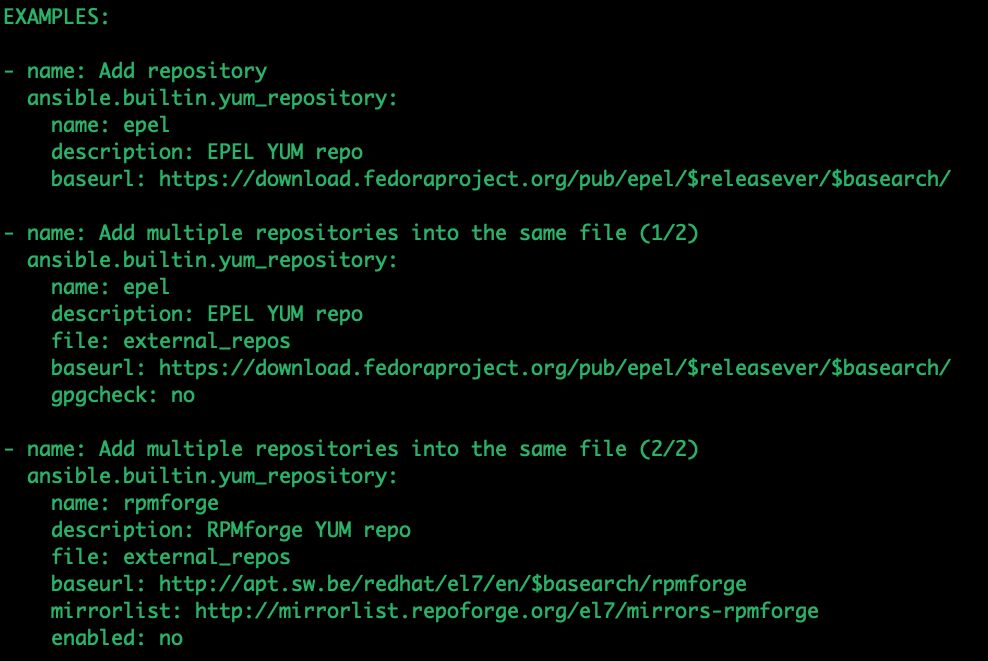
重要参考:
如果忘记模块名称,可以使用
ansible-doc -l | grep yum

ansible-doc yum_repository
使用“/”查找“EXAMPLES”
编写存储库脚本
vim /home/greg/ansible/adhoc.sh
#!/bin/bash
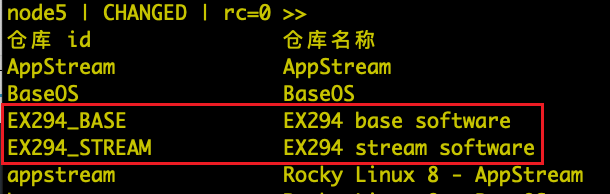
ansible all -m yum_repository -a 'file=EX294_BASE name=EX294_BASE description="EX294 base software" baseurl="http://mirrors.aliyun.com/centos-vault/8.5.2111/BaseOS/$basearch/os/" gpgcheck=yes gpgkey="http://mirrors.aliyun.com/centos/RPM-GPG-KEY-CentOS-Official" enabled=yes state=present'
ansible all -m yum_repository -a 'file=EX294_STREAM name=EX294_STREAM description="EX294 stream software" baseurl="http://mirrors.aliyun.com/centos-vault/8.5.2111/AppStream/$basearch/os/" gpgcheck=yes gpgkey=http://mirrors.aliyun.com/centos/RPM-GPG-KEY-CentOS-Official enabled=yes state=present'chmod +x adhoc.sh #给与执行权限
多执行几次
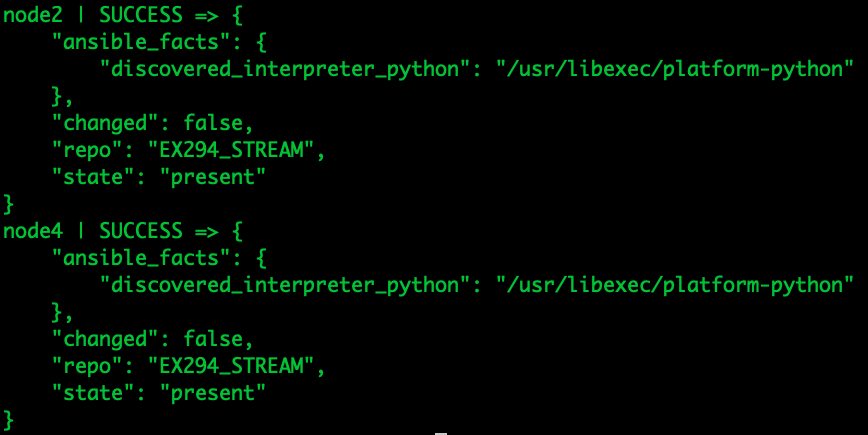
检查:
ansible all -a "yum makecache"
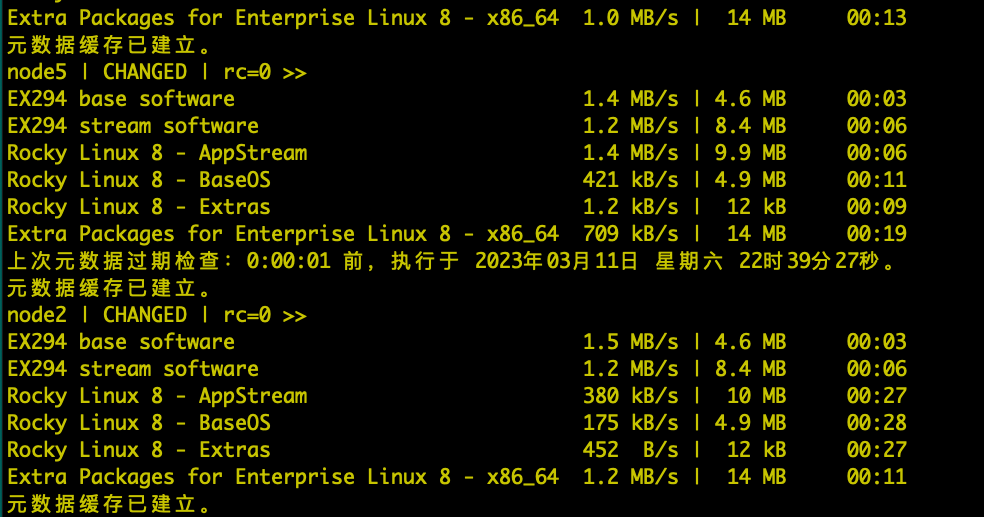
ansible all -m shell -a "yum repolist"
3、安装软件包(playbook):
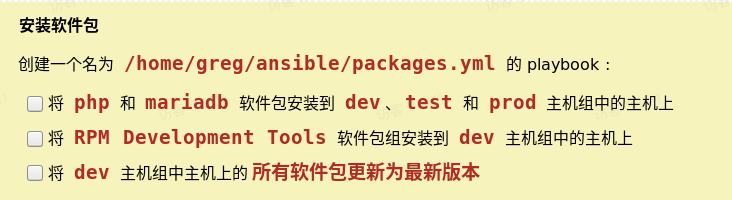
vi /home/greg/ansible/packages.yaml
---
- name: install php and mariadb
  hosts: dev,test,prod
  tasks:
    - name: install php and mariadb
      yum:
        name: php,mariadb
        state: present
- name: install Development Tools
  hosts: dev
  tasks:
    - name: install RPM Development Tools
      yum:
        name: '@RPM Development Tools'
        state: present
    - name: update all on dev
      yum:
        name: '*'
        state: latest
ansible-playbook packages.yaml

检查;
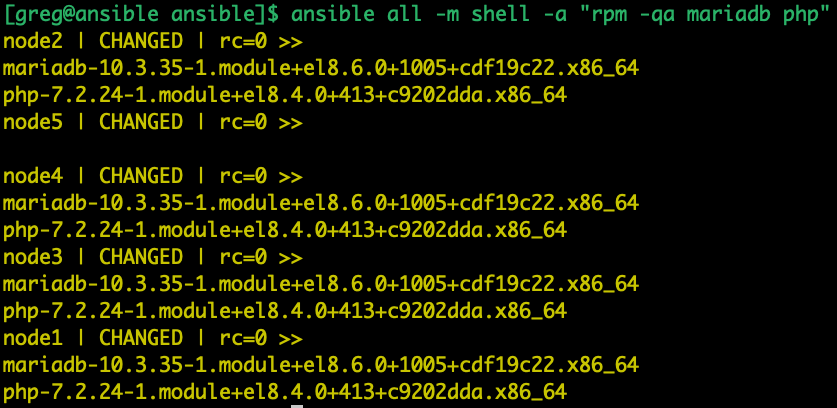
ansible all -m shell -a "rpm -qa mariadb php"
ansible dev -m shell -a "yum grouplist"

4、使用 RHEL 系统角色
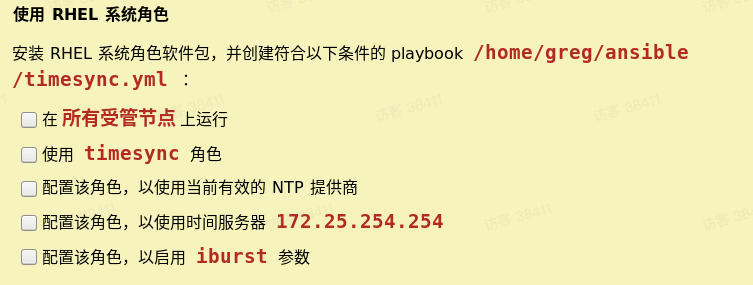
yum search rhel

ansible all -m ping -o #测试主机是否在线
sudo yum -y install rhel-system-roles #安装角色
rpm -ql rhel-system-roles | grep doc | grep time

vim ansible.cfg #修改路径
roles_path = /home/greg/ansible/roles:/usr/share/ansible/roles #第一道题已经做过,这里可以再检查一下
ansible-galaxy list #查看
cp -ar /usr/share/doc/rhel-system-roles/timesync/example-timesync-playbook.yml /home/greg/ansible/timesync.yml
vim timesync.yml #修改yml文件
hosts的值为all,hostname为172.25.254.254(实验中使用ntp.aliyun.com) ;iburst:yes
---
- hosts: all
  vars:
    timesync_ntp_servers:
      - hostname: ntp.aliyun.com
        iburst: yes
  roles:
    - rhel-system-roles.timesync
ansible-playbook timesync.yml #运行
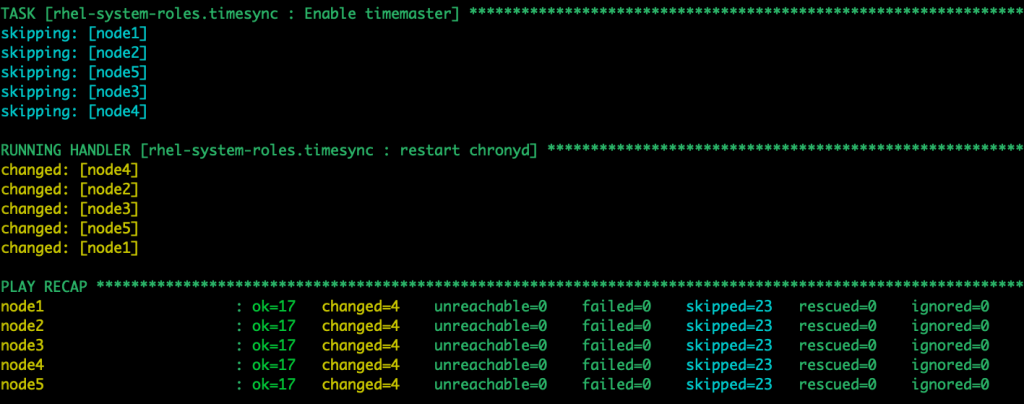
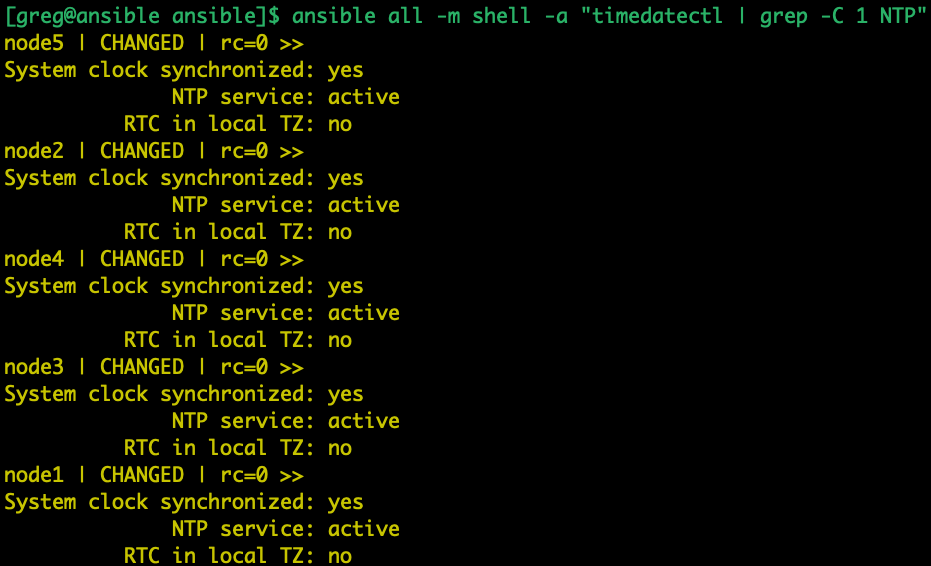
检查:
ansible all -m shell -a "timedatectl"
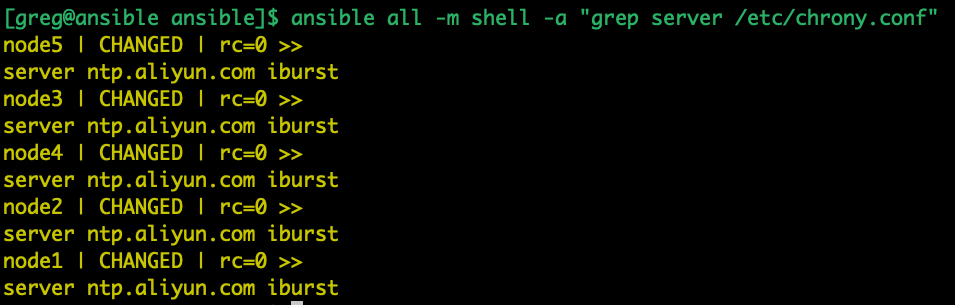
ansible all -m shell -a "grep server /etc/chrony.conf"
5、使用 Ansible Galaxy 安装角色
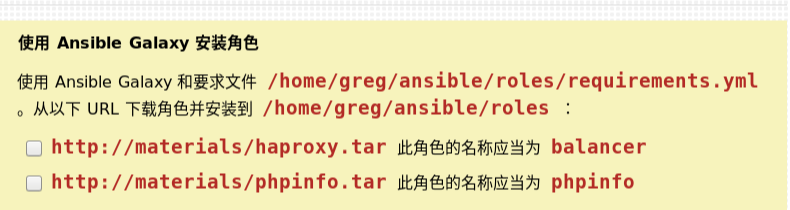
这里两个地址改写为:
http://192.168.122.200:/haproxy.tar
http://192.168.122.200:/phpinfo.tar
role目录下下载的内容
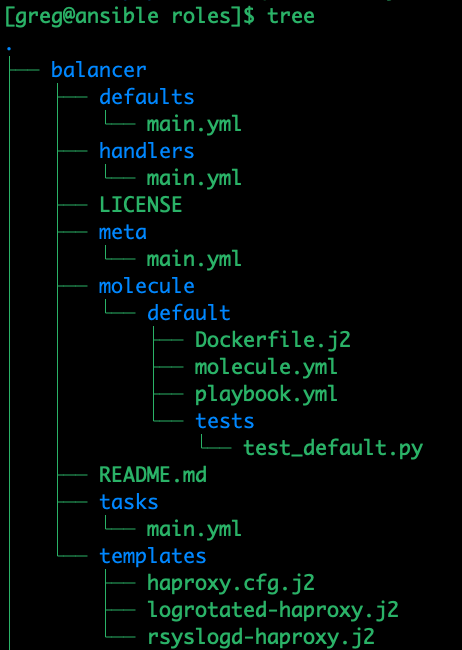
balancer:
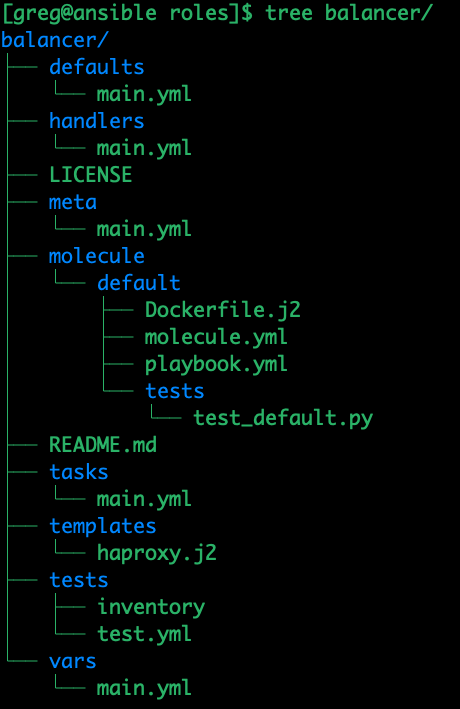
defaults -> main.yml
---
# defaults file for haproxy
handlers -> main.yml
---
# handlers file for haproxy
meta -> main.yml
galaxy_info:
  author: your name
  description: your description
  company: your company (optional)

  # If the issue tracker for your role is not on github, uncomment the
  # next line and provide a value
  # issue_tracker_url: http://example.com/issue/tracker

  # Choose a valid license ID from https://spdx.org - some suggested licenses:
  # - BSD-3-Clause (default)
  # - MIT
  # - GPL-2.0-or-later
  # - GPL-3.0-only
  # - Apache-2.0
  # - CC-BY-4.0
  license: license (GPL-2.0-or-later, MIT, etc)

  min_ansible_version: 2.4

  # If this a Container Enabled role, provide the minimum Ansible Container version.
  # min_ansible_container_version:

  #
  # Provide a list of supported platforms, and for each platform a list of versions.
  # If you don't wish to enumerate all versions for a particular platform, use 'all'.
  # To view available platforms and versions (or releases), visit:
  # https://galaxy.ansible.com/api/v1/platforms/
  #
  # platforms:
  # - name: Fedora
  #   versions:
  #   - all
  #   - 25
  # - name: SomePlatform
  #   versions:
  #   - all
  #   - 1.0
  #   - 7
  #   - 99.99

  galaxy_tags: []
    # List tags for your role here, one per line. A tag is a keyword that describes
    # and categorizes the role. Users find roles by searching for tags. Be sure to
    # remove the '[]' above, if you add tags to this list.
    #
    # NOTE: A tag is limited to a single word comprised of alphanumeric characters.
    #       Maximum 20 tags per role.

dependencies: []
  # List your role dependencies here, one per line. Be sure to remove the '[]' above,
  # if you add dependencies to this list.
meta -> .galaxy_install_info
{install_date: 'Thu Mar 30 11:17:58 2023', version: ''}tasks -> main.yml
---
# tasks file for haproxy
- name: install the latest version of haproxy
  yum:
    name: haproxy
    state: latest
- name: Template a file to /etc/haproxy/haproxy.cfg
  template:
    src: haproxy.j2
    dest: /etc/haproxy/haproxy.cfg
- name: Start service haproxy, if not started
  service:
    name: haproxy
    state: started
    enabled: yes
templates -> haproxy.j2
#---------------------------------------------------------------------
# Example configuration for a possible web application.  See the
# full configuration options online.
#
#   https://www.haproxy.org/download/1.8/doc/configuration.txt
#
#---------------------------------------------------------------------

#---------------------------------------------------------------------
# Global settings
#---------------------------------------------------------------------
global
    # to have these messages end up in /var/log/haproxy.log you will
    # need to:
    #
    # 1) configure syslog to accept network log events.  This is done
    #    by adding the '-r' option to the SYSLOGD_OPTIONS in
    #    /etc/sysconfig/syslog
    #
    # 2) configure local2 events to go to the /var/log/haproxy.log
    #   file. A line like the following can be added to
    #   /etc/sysconfig/syslog
    #
    #    local2.*                       /var/log/haproxy.log
    #
    log         127.0.0.1 local2

    chroot      /var/lib/haproxy
    pidfile     /var/run/haproxy.pid
    maxconn     4000
    user        haproxy
    group       haproxy
    daemon

    # turn on stats unix socket
    stats socket /var/lib/haproxy/stats

    # utilize system-wide crypto-policies
    ssl-default-bind-ciphers PROFILE=SYSTEM
    ssl-default-server-ciphers PROFILE=SYSTEM

#---------------------------------------------------------------------
# common defaults that all the 'listen' and 'backend' sections will
# use if not designated in their block
#---------------------------------------------------------------------
defaults
    mode                    http
    log                     global
    option                  httplog
    option                  dontlognull
    option http-server-close
    option forwardfor       except 127.0.0.0/8
    option                  redispatch
    retries                 3
    timeout http-request    10s
    timeout queue           1m
    timeout connect         10s
    timeout client          1m
    timeout server          1m
    timeout http-keep-alive 10s
    timeout check           10s
    maxconn                 3000

#---------------------------------------------------------------------
# main frontend which proxys to the backends
#---------------------------------------------------------------------
frontend main
    bind *:80
    acl url_static       path_beg       -i /static /images /javascript /stylesheets
    acl url_static       path_end       -i .jpg .gif .png .css .js

    use_backend static          if url_static
    default_backend             app

#---------------------------------------------------------------------
# static backend for serving up images, stylesheets and such
#---------------------------------------------------------------------
backend static
    balance     roundrobin
    server      static 127.0.0.1:80 check

#---------------------------------------------------------------------
# round robin balancing between the various backends
#---------------------------------------------------------------------
backend app
    balance     roundrobin
    {% for host in groups['webservers'] %}
    server  {{hostvars[host]['inventory_hostname']}} {{host}}:80 check
    {% endfor %}
tests -> inventory
localhosttests -> test.yml
---
- hosts: localhost
  remote_user: root
  roles:
    - haproxy
vars -> main.yml
---
# vars file for haproxy
phpinfo
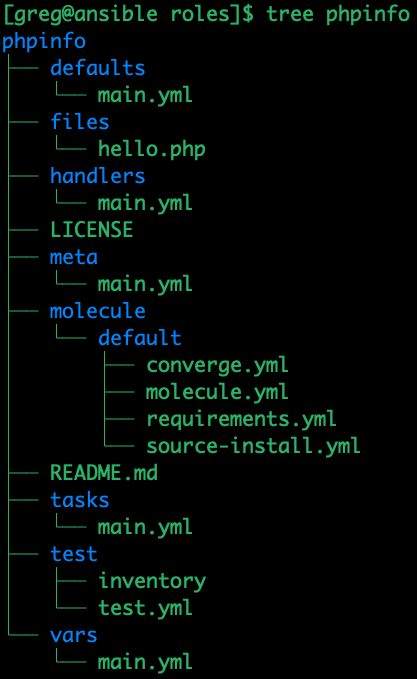
defaults -> main.yml
---
# defaults file for phpinfo
handlers -> main.yml
---
# handlers file for phpinfo
meta -> main.yml
galaxy_info:
  author: your name
  description: your description
  company: your company (optional)

  # If the issue tracker for your role is not on github, uncomment the
  # next line and provide a value
  # issue_tracker_url: http://example.com/issue/tracker

  # Choose a valid license ID from https://spdx.org - some suggested licenses:
  # - BSD-3-Clause (default)
  # - MIT
  # - GPL-2.0-or-later
  # - GPL-3.0-only
  # - Apache-2.0
  # - CC-BY-4.0
  license: license (GPL-2.0-or-later, MIT, etc)

  min_ansible_version: 2.4

  # If this a Container Enabled role, provide the minimum Ansible Container version.
  # min_ansible_container_version:

  #
  # Provide a list of supported platforms, and for each platform a list of versions.
  # If you don't wish to enumerate all versions for a particular platform, use 'all'.
  # To view available platforms and versions (or releases), visit:
  # https://galaxy.ansible.com/api/v1/platforms/
  #
  # platforms:
  # - name: Fedora
  #   versions:
  #   - all
  #   - 25
  # - name: SomePlatform
  #   versions:
  #   - all
  #   - 1.0
  #   - 7
  #   - 99.99

  galaxy_tags: []
    # List tags for your role here, one per line. A tag is a keyword that describes
    # and categorizes the role. Users find roles by searching for tags. Be sure to
    # remove the '[]' above, if you add tags to this list.
    #
    # NOTE: A tag is limited to a single word comprised of alphanumeric characters.
    #       Maximum 20 tags per role.

dependencies: []
  # List your role dependencies here, one per line. Be sure to remove the '[]' above,
  # if you add dependencies to this list.
.galaxy_install_info
{install_date: 'Thu Mar 30 11:17:58 2023', version: ''}tasks -> main.yml
---
# tasks file for phpinfo
- name: install the latest version of php
  yum:
    name: php
    state: latest
- name: Copy file with owner and permissions
  copy:
    src: hello.php
    dest: /var/www/html
tests -> inventory
localhosttests -> test.yml
---
- hosts: localhost
  remote_user: root
  roles:
    - phpinfo
vars -> main.yml
---
# vars file for phpinfo
files -> hello.php
Hello PHP World from <?php echo gethostname(); ?>
<?php phpinfo(); ?>
移动到ansible网页跟目录下
sudo yum -y install httpd
sudo systemctl start httpd
tar -cvf balancer.tar balancer && tar -cvf phpinfo.tar phpinfo
sudo mv balancer.tar /var/www/html/
sudo mv phpinfo.tar /var/www/html/
测试下:
wget http://192.168.122.200:/phpinfo.tar

vi /home/greg/ansible/roles/requirements.yml
---
- src: https://192.168.122.200:/haproxy.tar
  name: balancer
- src: https://192.168.122.200:/phpinfo.tar
  name: phpinfo
ansible-galaxy list

6、创建和使用角色
题目:
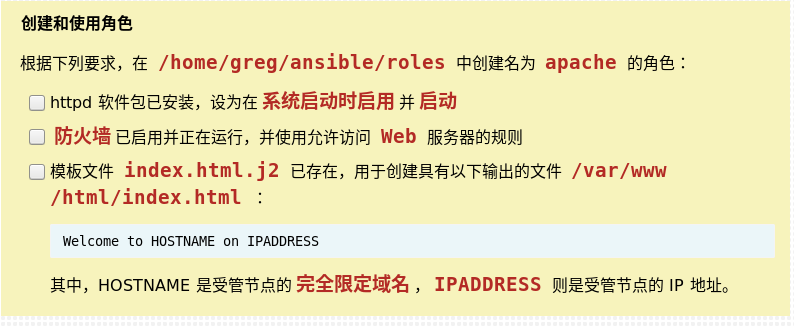
做题;
cd /home/greg/ansible/roles
ansible-galaxy init apache
vim apache/tasks/main.yml
---
# tasks file for apache
- name: start service apache
  service:
    name: httpd
    state: started
    enabled: yes
- name: start service firewalld
  service:
    name: firewalld
    state: started
    enabled: yes
- name: open firewalld port
  firewalld:
    service: http
    permanent: yes
    state: enabled
    immediate: yes
- name: template a file
  template:
    src: index.html.j2
    dest: /var/www/html/index.html
vim /home/greg/ansible/roles/apache/templates/index.html.j2
Welcome to {{ ansible_fqdn }} on {{ ansible_default_ipv4.address }}vi /home/greg/ansible/apahce-test.yml
---
- name: test roles
  hosts: webservers
  roles:
    - apache
ansible-playbook apache-test.yml
tips:
firewalld模块:
service : Name of a service to add/remove to/from firewalld.The service must be listed in output of firewall-cmd --get-services.指定放行的服务,此服务必须要在firewall-cmd --get-services查询的到。
permanent : Should this configuration be in the running firewalld configuration or persist across reboots. As of Ansible 2.3, permanent operations can operate on firewalld configs when it is not running.
Note that if this is no’, immediate is assumed yes’.保存策略,下次启动的时候自动加载
state : Enable or disable a setting.For ports: Should this port accept (enabled) or reject (disabled) connections.The states present’ and absent’ can only be used in zone level operations (i.e. when no other parameters but zone and state are set).
(Choices: absent, disabled, enabled, present)指定防火墙策略状态,enable表示策略生效,disable表示策略禁用,present新建策略,absent删除策略。
port : Name of a port or port range to add/remove to/from firewalld. Must be in the form PORT/PROTOCOL or PORT-PORT/PROTOCOL for port ranges.指定放行的端口/协议。
zone : The firewalld zone to add/remove to/from.
Note that the default zone can be configured per system but public’ is default from upstream.Available choices can be extended based on per-system configs, listed here are “out of the box” defaults.Possible values include block’, dmz’, drop’, external’, home’, internal’, `public’, trusted’, work’.指定防火墙信任级别。
drop: 丢弃所有进入的包,而不给出任何响应
block: 拒绝所有外部发起的连接,允许内部发起的连接
public: 允许指定的进入连接
external: 同上,对伪装的进入连接,一般用于路由转发
dmz: 允许受限制的进入连接
work: 允许受信任的计算机被限制的进入连接,类似 workgroup
home: 同上,类似 homegroup
internal: 同上,范围针对所有互联网用户
trusted: 信任所有连接
interface : The interface you would like to add/remove to/from a zone in firewalld.指定接口属于哪个信任级别。
source : The source/network you would like to add/remove to/from firewalld.指定网段。
immediate : Should this configuration be applied immediately, if set as permanent防火墙策略立即生效。
7、从 Ansible Galaxy 使用角色

vim /home/greg/ansible/roles.yml
---
- name: use role apache and php
  hosts: webservers
  roles:
    - phpinfo
    - apache
- name: use role balancer
  hosts: balancers
  roles:
    - balancer
ansible-playbook roles.yml

检查:


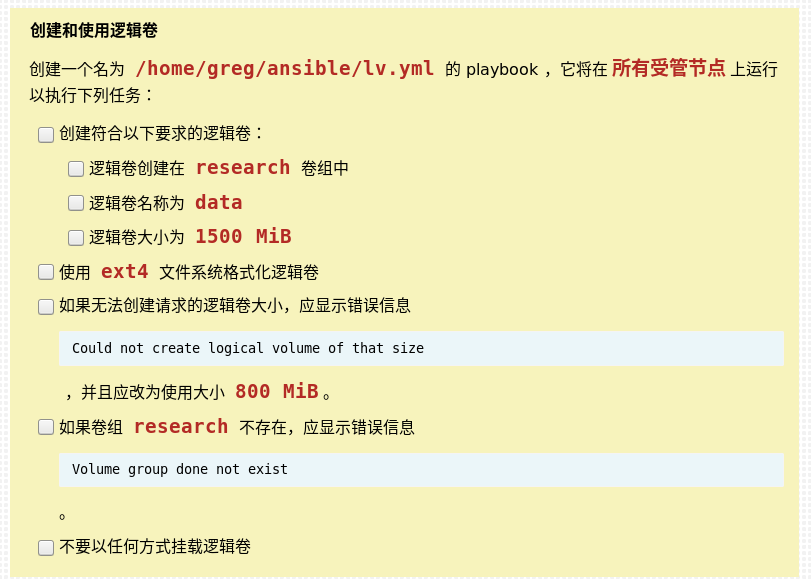
8、创建和使用逻辑卷
准备:
在node02和node03上:
fdisk -l /dev/nvme0n2
分别分出一个2G和1G的分区创建卷组,名称为research
pvcreate /dev/nvme0n2p1
vgcreate research /dev/nvme0n2p1
vgs

做题:
考点总结:
when多重条件判断: 判断是否存在逻辑卷以及是否可以创建满足大小的逻辑卷
setup模块获取目标逻辑卷名称,以此作为判断依据
block磁盘模块
	lvol逻辑卷创建
		vg :在哪个逻辑卷组下创建逻辑卷
		lv:需要被创建的逻辑卷名称
		size:创建的逻辑卷大小
rescue模块
	写在tasks中,与 block 并列要注意,在block中定义的任务失败时,需要运行的任务,相当于子任务,block和rescue只能执行一个
ignore_errors: yes 的使用方式
vi /home/greg/ansible/lv.yml
---
- name: create lv
  hosts: all
  tasks:
  - block:
    - name: create data of 1500M
      lvol:
        vg: research
        lv: data
        size: 1500
    - name: ext4 filesystem
      filesystem:
        fstype: ext4
        dev: /dev/research/data
    rescue: # 在block中定义的任务失败时,需要运行的任务
    - debug:
        msg: Could not create logical volume of that size
    - name: create data of 800M
      lvol:
        vg: research
        lv: data
        size: 800
      when: ansible_lvm.vgs.research is defined # 如果定义了research 逻辑卷,说明 1500M 太高,创建 800M 进行补救
    - name: ext4 filesystem
      filesystem:
        fstype: ext4
        dev: /dev/research/data
      when: ansible_lvm.vgs.research is defined
      ignore_errors: yes # 如果未能成功格式化文件系统,也要忽略报错
    - debug:
        msg: Volume group done not exist
      when: ansible_lvm.vgs.research is undefined
ansible-playbook lv.yml

ansible all -a 'lvs'

9、生成一个 hosts 文件

这里补充个知识点:
FQDN 全称 Fully Qualified Domain Name
即全限定域名:同时带有主机名和域名的名称
FQDN = Hostname + DomainName
考点:
* jianjia 模板引用 setup 1:模块中获取的变量2:groups 主机组变量 进行模板渲染

* jianjia2循环格式:
	{% for index in indexs %}
            {{ index }}
        {% endfor %}

* jianjia2 以列表、字典方式进行取值
	{{ mydict['key'] }}
        {{ mylist[3] }}
        {{ mylist[myintvar] }}
        {{ myobj.somemethod() }}
	本题中采用了{{ mylist_dict[myintvar]['key']  }}方式,在嵌套了字典的列表中进行取值,列表为 all 主机组,列表元素为主机,字典value为具体主机的相关采集信息

facts变量
	"ansible_default_ipv4" "ansible_fqdn" "ansible_hostname"的意义

*  debug 模块中 hostvars 中inventory_hostname、groups['all']魔法变量获取和衔接 facts 变量的过程
jianjia2中的魔法变量如何从hostvars得来的?
除了setup 模块,debug 也可以采集一些变量
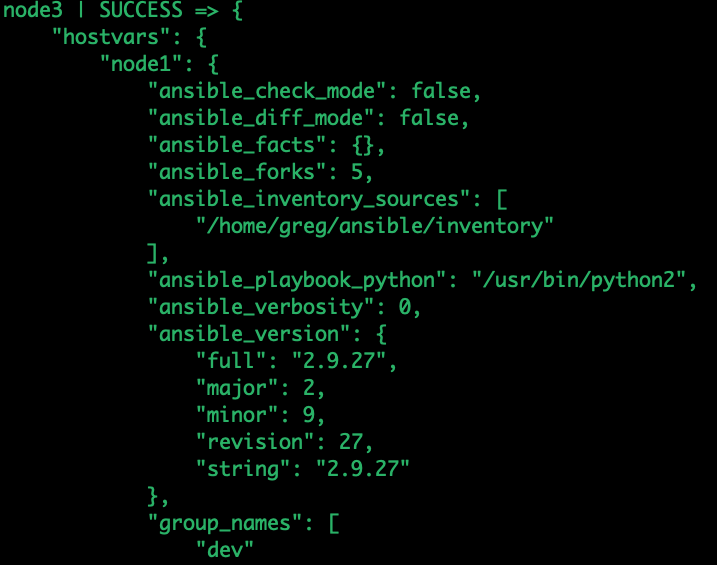
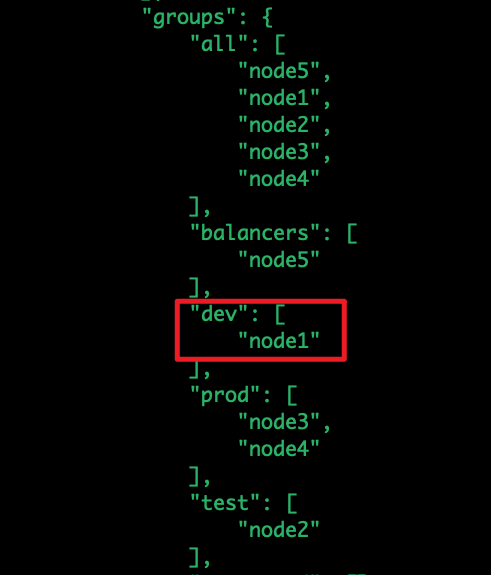
ansible all -m debug -a "var=hostvars" | less
for host in hostvars[host]由来
groups['all']由来

when: inventory_hostname in groups['dev'] 由来

我们可以通过hostvars->ansible_facts获取变量,这些魔法变量是ansible自动提供的,我们不需要定义,play-book在运行时,ansible会自动匹配魔法变量,然后赋值
开始做题:
cd /home/greg/ansible
wget http://materials/hosts.j2 #这个自己写下就好
127.0.0.1 localhost localhost.localdomain localhost4 localhost4.localdomain4
::1 localhost localhost.localdomain localhost6 localhost6.localdomain6
vim hosts.j2 # 注意一下魔法变量,感受一下这些变量和 facts 变量的衔接使用
127.0.0.1 localhost localhost.localdomain localhost4 localhost4.localdomain4
::1 localhost localhost.localdomain localhost6 localhost6.localdomain6
{% for host in groups['all'] %}
{{ hostvars[host]['ansible_default_ipv4']['address'] }} {{ hostvars[host]['ansible_fqdn'] }} {{ hostvars[host]['ansible_hostname'] }}
{% endfor %}
寻找 facts 变量:
ansible dev -m setup -a "filter=ansible_hostname,ansible_fqdn,ansible_default_ipv4" (部分 linux 系统版本不支持使用“,”作为分隔符批量查询,这里也可以使用 grep 查询)
可以将层级关系看清楚,只需要记住三个关键词:"ansible_default_ipv4" "ansible_fqdn" "ansible_hostname"
vi hosts.yml
---
- name: create my hosts
  hosts: all
  tasks:
    - name: template a file /etc/myhosts
      template:
        src: /home/greg/ansible/hosts.j2
        dest: /etc/myhosts
      when: inventory_hostname in groups['dev']
ansible-playbook hosts.yml

检查:
ansible all -m shell -a "cat /etc/myhosts"

10、修改文件内容

vi /home/greg/ansible/issue.yml
---
- name: replace issue
  hosts: all
  tasks:
    - name: replace Development
      copy:
        content: "Development"
        dest: /etc/issue
      when: inventory_hostname in groups.dev # 与groups['dev']取值方式相同,这样表示也可以
    - name: replace Test
      copy:
        content: "Test"
        dest: /etc/issue
      when: inventory_hostname in groups.test
    - name: replace Production
      copy:
        content: "Production"
        dest: /etc/issue
      when: inventory_hostname in groups['prod'] # 这样表示也可以
ansible-playbook /home/greg/ansible/issue.yml

检查:
ansible dev -a 'cat /etc/issue'
ansible test -a 'cat /etc/issue'
ansible prod -a 'cat /etc/issue'
11、创建 Web 内容目录
准备:
登录到dev服务器上
groupadd webdev
考点:
ansible file模块常用参数,可以查看 doc 文档
path:指定文件或目录的路径。
state:指定文件或目录的状态,可选值为file、directory、link、hard、absent,默认为file。
mode:指定文件或目录的权限,可以使用数字或字符串表示,如0644或u=rw,g=r,o=r。
owner:指定文件或目录的所有者。
group:指定文件或目录的所属组。
src:指定源文件的路径,用于创建符号链接。
dest:指定符号链接的目标路径。
recurse:指定是否递归处理目录,默认为no。
force:指定是否强制覆盖已存在的文件或目录,默认为no。
backup:指定是否备份已存在的文件或目录,默认为no。
follow:指定是否跟随符号链接,默认为yes。
selevel:指定SELinux安全级别。
serole:指定SELinux安全角色。
setype:指定SELinux安全类型。
seuser:指定SELinux安全用户。
一个web服务安装到配置到开启的整个过程:
创建目录、创建文件、修改权限、指定SELinux安全类型
开启网站服务,开启防火墙服务
开通防火墙规则
做题:
vim /home/greg/ansible/webcontent.yml
---
- name: webcontent
  hosts: dev
  tasks:
    - name: create dir
      file:
        path: /webdev
        group: webdev
        mode: "2775"
        setype: httpd_sys_content_t
        state: directory
    - name: create link
      file:
        src: /webdev
        dest: /var/www/html/webdev
        state: link
    - name: create index.html
      copy:
        content: "Development"
        dest: /webdev/index.html
        setype: httpd_sys_content_t
    - name: start http service
      service:
         name: httpd
         state: started
         enabled: yes
    - name: start firewalld service
      service:
         name: firewalld
         state: started
         enabled: yes
    - name: firewall
      firewalld:
         service: http
         immediate: yes
         permanent: yes
         state: enabled
ansible-playbook /home/greg/ansible/webcontent.yml

测试:
curl http://node1/webdev/

12、生成硬件报告
wget http://materials/hwreport.empty(练习时直接本地写即可)
HOST=inventoryhostname
MEMORY=memort_in_MB
BIOS=BIOS_version
DISK_SIZE_VDA=disk_vda_size
DISK_SIZE_VDB=disk_vdb_size
vim /home/greg/ansible/hwreport.yml
---
- name: create report
  hosts: all
  tasks:
    - name: download hw report
      get_url:
        url:  "http://materials.example.com/hwreport.empty"
        dest: /root/hwreport.txt
        force: yes
    - name: generate report
      lineinfile:
        path: /root/hwreport.txt
        regexp: "{{ item.name }}"
        line: "{{ item.name }}={{ item.value }}"
      loop:
        - name: HOST
          value: "{{ inventory_hostname | default('NONE',true) }}"
        - name: MEMORY
          value: "{{ ansible_memtotal_mb | default('NONE',true) }}"
        - name: BIOS
          value: "{{ ansible_bios_version | default('NONE',true) }}"
        - name: DISK_SIZE_VDA
          value: "{{ ansible_devices.nvme0n1.size | default('NONE',true) }}" # 注意磁盘名称nvme0n1根据不通系统去修改
        - name: DISK_SIZE_VDB
value: "{{ ansible_devices.nvme0n2.size | default('NONE',true) }}"通过匹配"{{ item.name }}"来取代这一行,取代格式为"{{ item.name }}={{ item.value }}"
ansible-playbook hwreport.yml

检查:
ansible all -a "cat /root/hwreport.txt"

13、创建密码库:
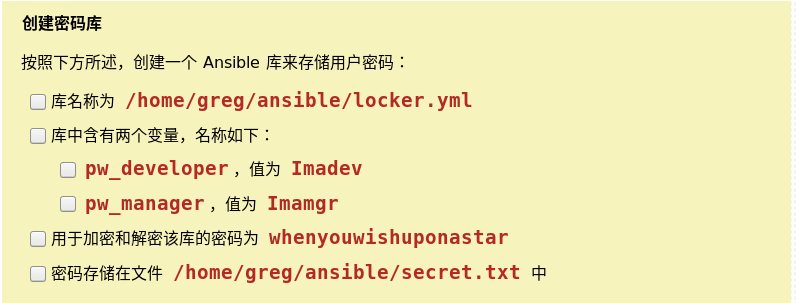
vim ansible.cfg
vault_password_file = /home/greg/ansible/secret.txt
echo "whenyouwishuponastar" >/home/greg/ansible/secret.txt
ansible-vault create locker.yml
---
pw_developer: Imadev
pw_manager: Imamgr
cat locker.yml

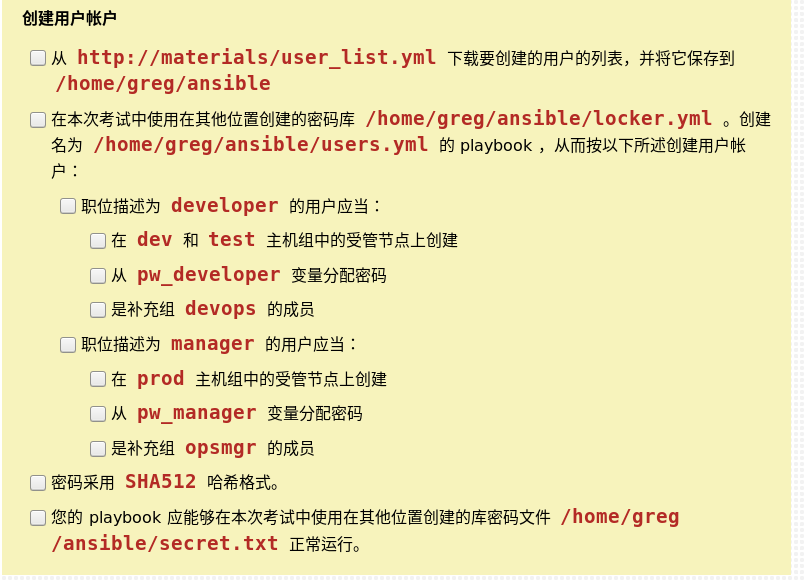
14、创建用户账户
知识点:
sha512加密:
echo -n "Hello World" | openssl dgst -sha512
(stdin)= 2c74fd17edafd80e8447b0d46741ee243b7eb74dd2149a0ab1b9246fb30382f27e853d8585719e0e67cbda0daa8f51671064615d645ae27acb15bfb1447f459b
wget http://materials/user_list.yml(这里可以模拟从ansible本地安装:wget http://192.168.122.200/user_list.yml)
user_list.yml
users:
  - name: bob
    job: developer
  - name: sally
    job: manager
  - name: fred
    job: developer
vim /home/greg/ansible/users.yml
---
- name: create user for dev,test
  hosts: dev,test
  vars_files:
  - /home/greg/ansible/user_list.yml
  - /home/greg/ansible/locker.yml
  tasks:
  - name: create devops group
    group:
      name: devops
      state: present
  - name: create developer user
    user:
      name: "{{ item.name }}"
      groups: devops
      password: "{{ pw_developer | password_hash('sha512') }}"
      append: yes
    loop: "{{ users }}"
    when: item.job == 'developer'
- name: create user for prod
  hosts: prod
  vars_files:
  - /home/greg/ansible/user_list.yml
  - /home/greg/ansible/locker.yml
  tasks:
  - name: create opsmgr group
    group:
      name: opsmgr
      state: present
  - name: create manager user
    user:
      name: "{{ item.name }}"
      groups: opsmgr
      password: "{{ pw_manager | password_hash('sha512') }}"
      append: yes
    loop: "{{ users }}"
    when: item.job == 'manager'
检查:
ansible dev,test -a 'id bob'
ansible dev,test -a 'id fred'
ansible prod -a 'id sally'

ssh bob@node1 #密码:Imadev
ssh sally@node3 #密码:Imamgr
15、更新Ansible库密钥

准备:
创建一个有数据的文件
echo 'the is encrypt' > salaries.yml
创建存放密码的密码谱
echo 'insecure8sure' > secret_current.txt
编辑ansible.cfg配置文件,把vault_password_file存在的行注释掉
使用secret_current.txt密码谱加密
ansible-vault encrypt salaries.yml --vault-password-file=/home/greg/ansible/secret_current.txt

# tips:解密
ansible-vault decrypt salaries.yml --vault-password-file=/home/greg/ansible/secret_current.txt

做题:
修改:ansible-vault rekey salaries.yml (密码是:insecure8sure)

使用现有的密码查看
ansible-vault view salaries.yml

16、安装RHEL SELINUX角色
题目:
安装RHEL角色,并使用SeLinux角色,要求在所有节点运行,将SELINUX设置为强制模式
解题:
yum search rhel

sudo yum install rhel-system-roles -y
cd /home/greg/ansible/roles
cp -rf /usr/share/ansible/roles/linux-system-roles.selinux/ ./
cp -r /usr/share/doc/rhel-system-roles/selinux/example-selinux-playbook.yml /home/greg/ansible/selinux.yml
vim /home/greg/ansible/selinux.yml
---
- hosts: all
vars:
selinux_policy: targeted
selinux_state: enforcing
roles:
- role: rhel-system-roles.selinux
tasks:
- name: apply SElinux role
block:
- include_role:
name: rhel-system-roles.selinux
rescue:
- name: check
fail:
msg: "role failed"
when: not selinux_reboot_required
- name: reboot
shell: reboot
- name: reapply the role
include_role:
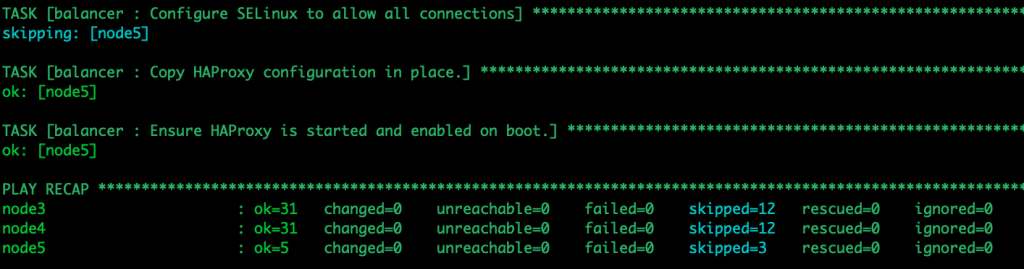
name: rhel-system-roles.selinuxansible-playbook /home/greg/ansible/selinux.yml

ansible-galaxy list

17、创建新的磁盘分区
题目:
在balancers主机上,划分新的partition,/dev/vdd,编号1,大小1500m,格式化成ext4,mount到/newpart1目录,如果空间不够,分800m,如果没有vdd,报错
做题:
vim partition.yml
---
- name: partition
  hosts: balancers
  tasks:
  - name: create a directory
    file:
      name: /newpart
      state: directory
  - block:
    - name: device 1500M
      parted:
        device: /dev/vdc                                 #指定硬盘
        number: 1                                        #编号为1
        state: present
        part_end: 1500MiB                                #分区结束位置
    - name: ext4 filesystem
      filesystem:
        fstype: ext4
        dev: /dev/vdc1
    - name: mount
      mount:
        path: /newpart                                   #挂载到那个目录
        src: /dev/vdc1                                   #挂载内容
        fstype: ext4                                     #文件系统格式
        state: mounted                                   #进行挂载,并修改fstab
    rescue:
    - debug:
        msg: Could not create partation of that size
    - name: device 800M
      parted:
        device: /dev/vdc
        number: 1
        state: present
        part_end: 800MiB
      when: ansible_vdc is defined
    - name: ext4 filesystem
      filesystem:
        fstype: ext4
        dev: /dev/vdc1
      when: ansible_devices.vdc is defined
    - name: mount
      mount:
        path: /newpart
        src: /dev/vdc1
        fstype: ext4
        state: mounted
      when: ansible_devices.vdc is defined
    - debug:
        msg: Disk does not exist
      when: ansible_devices.vdc is undefined
18、创建到期用户账户
题目:
创建用户账户,账户jack,新增设置密码有效期为30天。账户jony,新增设置相应的ID1111,用户有效期到2024-01-20
date -d 2024-01-20 +%s #获取对应日期的unix时间戳
1705726800
vim create_user.yml
---
- hosts: all
  vars:
    - users:
      - name: jack
      - name: jony
  tasks:
  - name: create user
    user:
      name: "{{ item.name }}"
      password: "{{ 'redhat'| password_hash('sha512') }}"
    loop: "{{ users }}"
  - name: Set user validity period
    user:
      name: "{{ item.name }}"
      uid: 1111                                #指定用户uid
      expires: 1705726800                      #指定账户到期时间,需要获取时间戳
    loop: "{{ users }}"
    when: item.name == 'jony'                  #作用于jony这个用户
  - name: Password expired
    shell: chage -M 30 "{{ item.name }}"       #shell命令,账号使用期限30天
    loop: "{{ users }}"
    when: item.name == 'jack'
19、创建定时任务
题目:用户jack每三个月的每周日晚上22点39分查看一次自身用户登录情况
准备:ansible all -a "useradd jack"
vim crontab.yml
---
- hosts: all
  tasks:
  - name: create a cron file under /etc/cron.d
    cron:
      name: Lgin time
      minute: "39"                        #分
      hour: "22"                          #时
#     day: ""                             #日
      month: "*/3"                        #月
      weekday: "0"                        #周
      user: jack                          #指定用户
      job: "(last && lastb)|grep jack"    #执行内容
ansible-playbook crontab.yml
检查:
ansible all -a "crontab -u jack -l"

发布者:LJH,转发请注明出处:https://www.ljh.cool/33787.html